We remain fully operational. Our teams are working around the clock to ensure your deliveries continue safely.

DOWNLOAD THE APP


Customer Services
Copyright © 2025 Desertcart Holdings Limited
DOWNLOAD THE APP


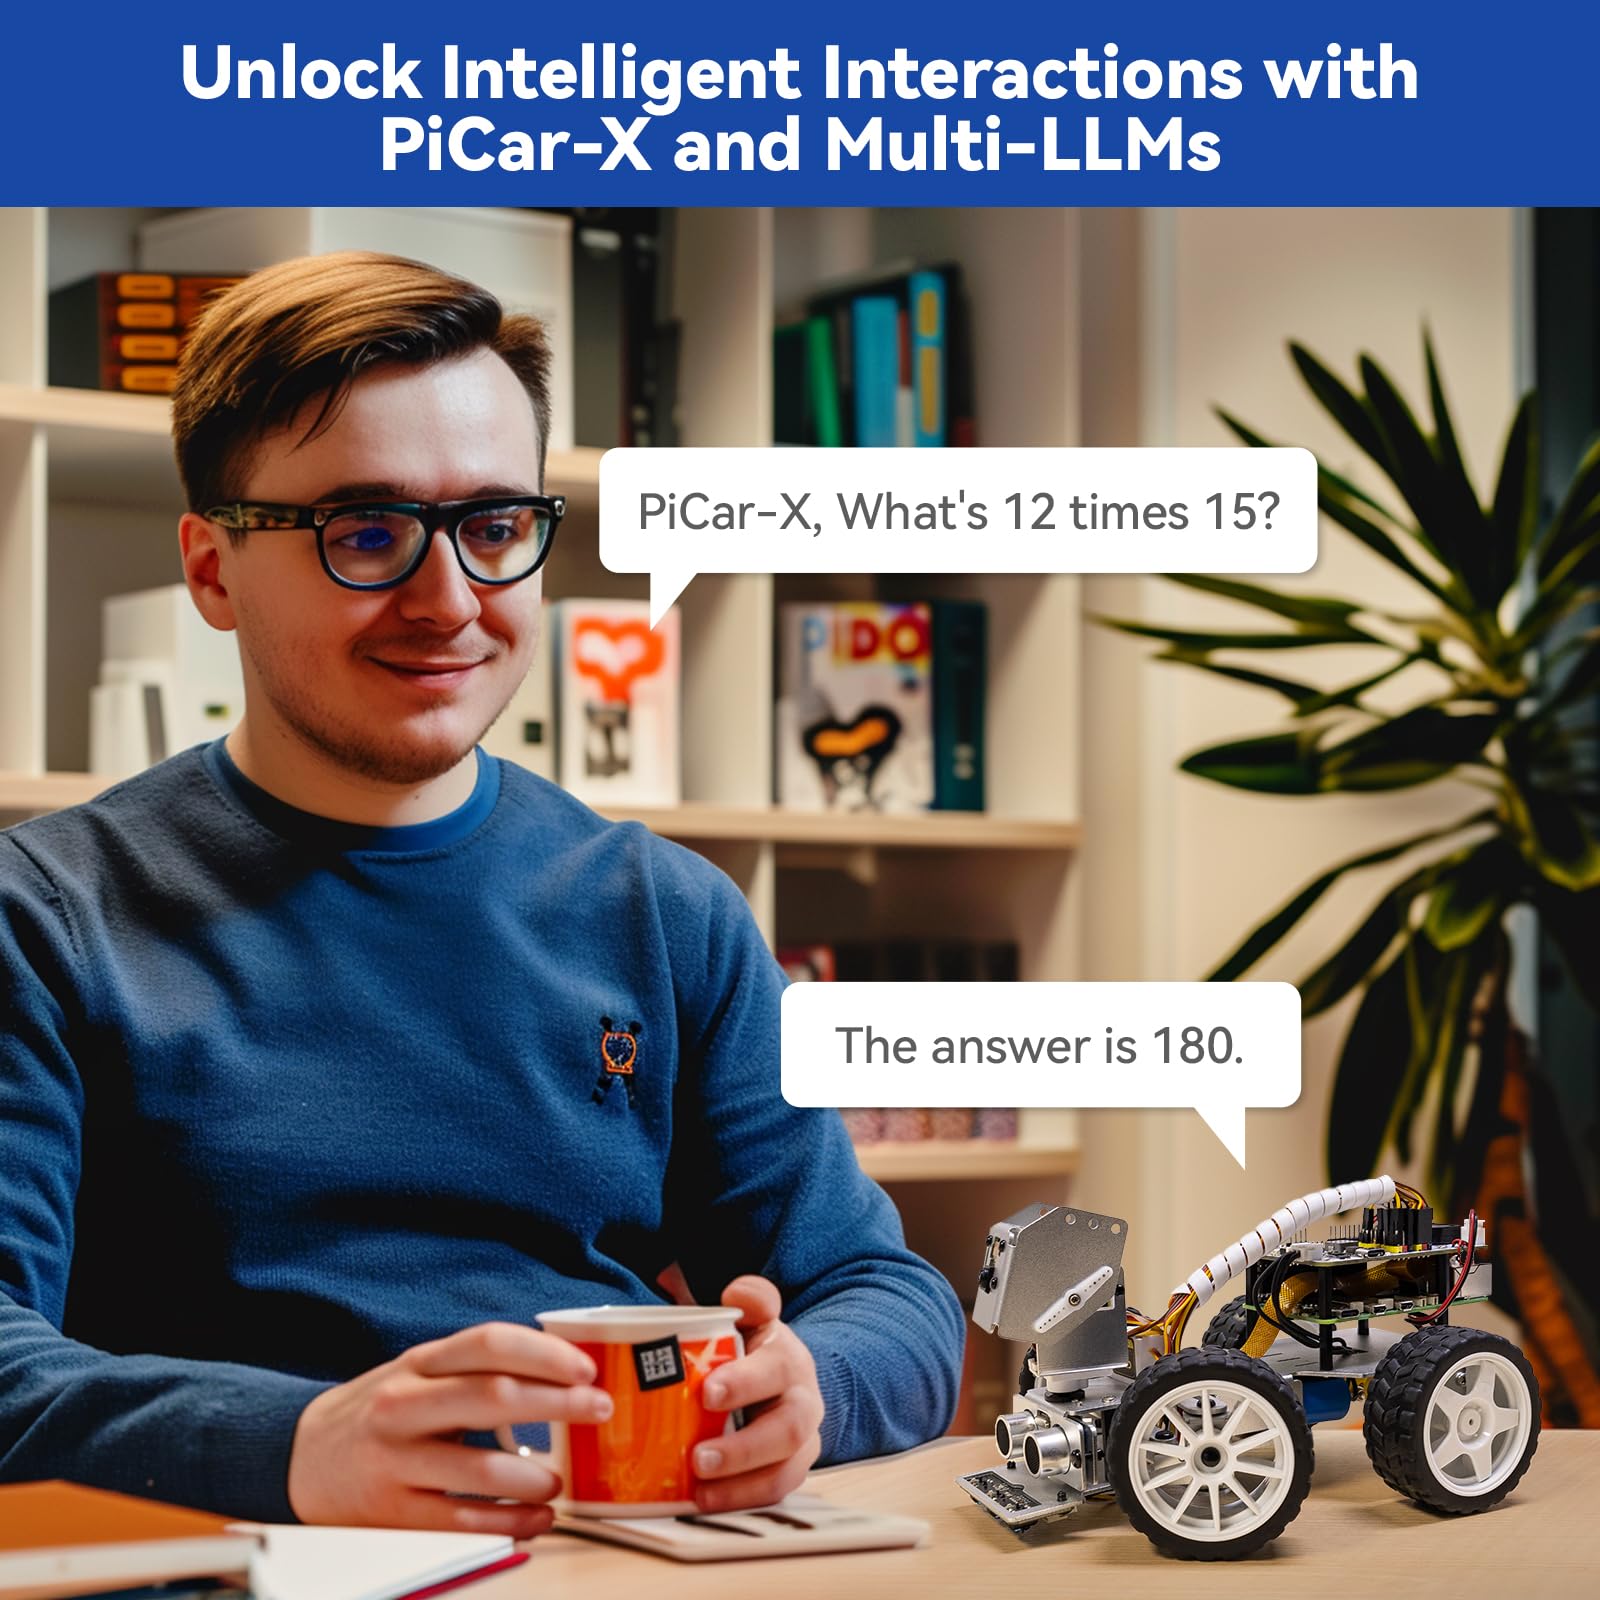


🚗💡 Drive the future of AI learning with PiCar-X — where robotics meets next-level intelligence!
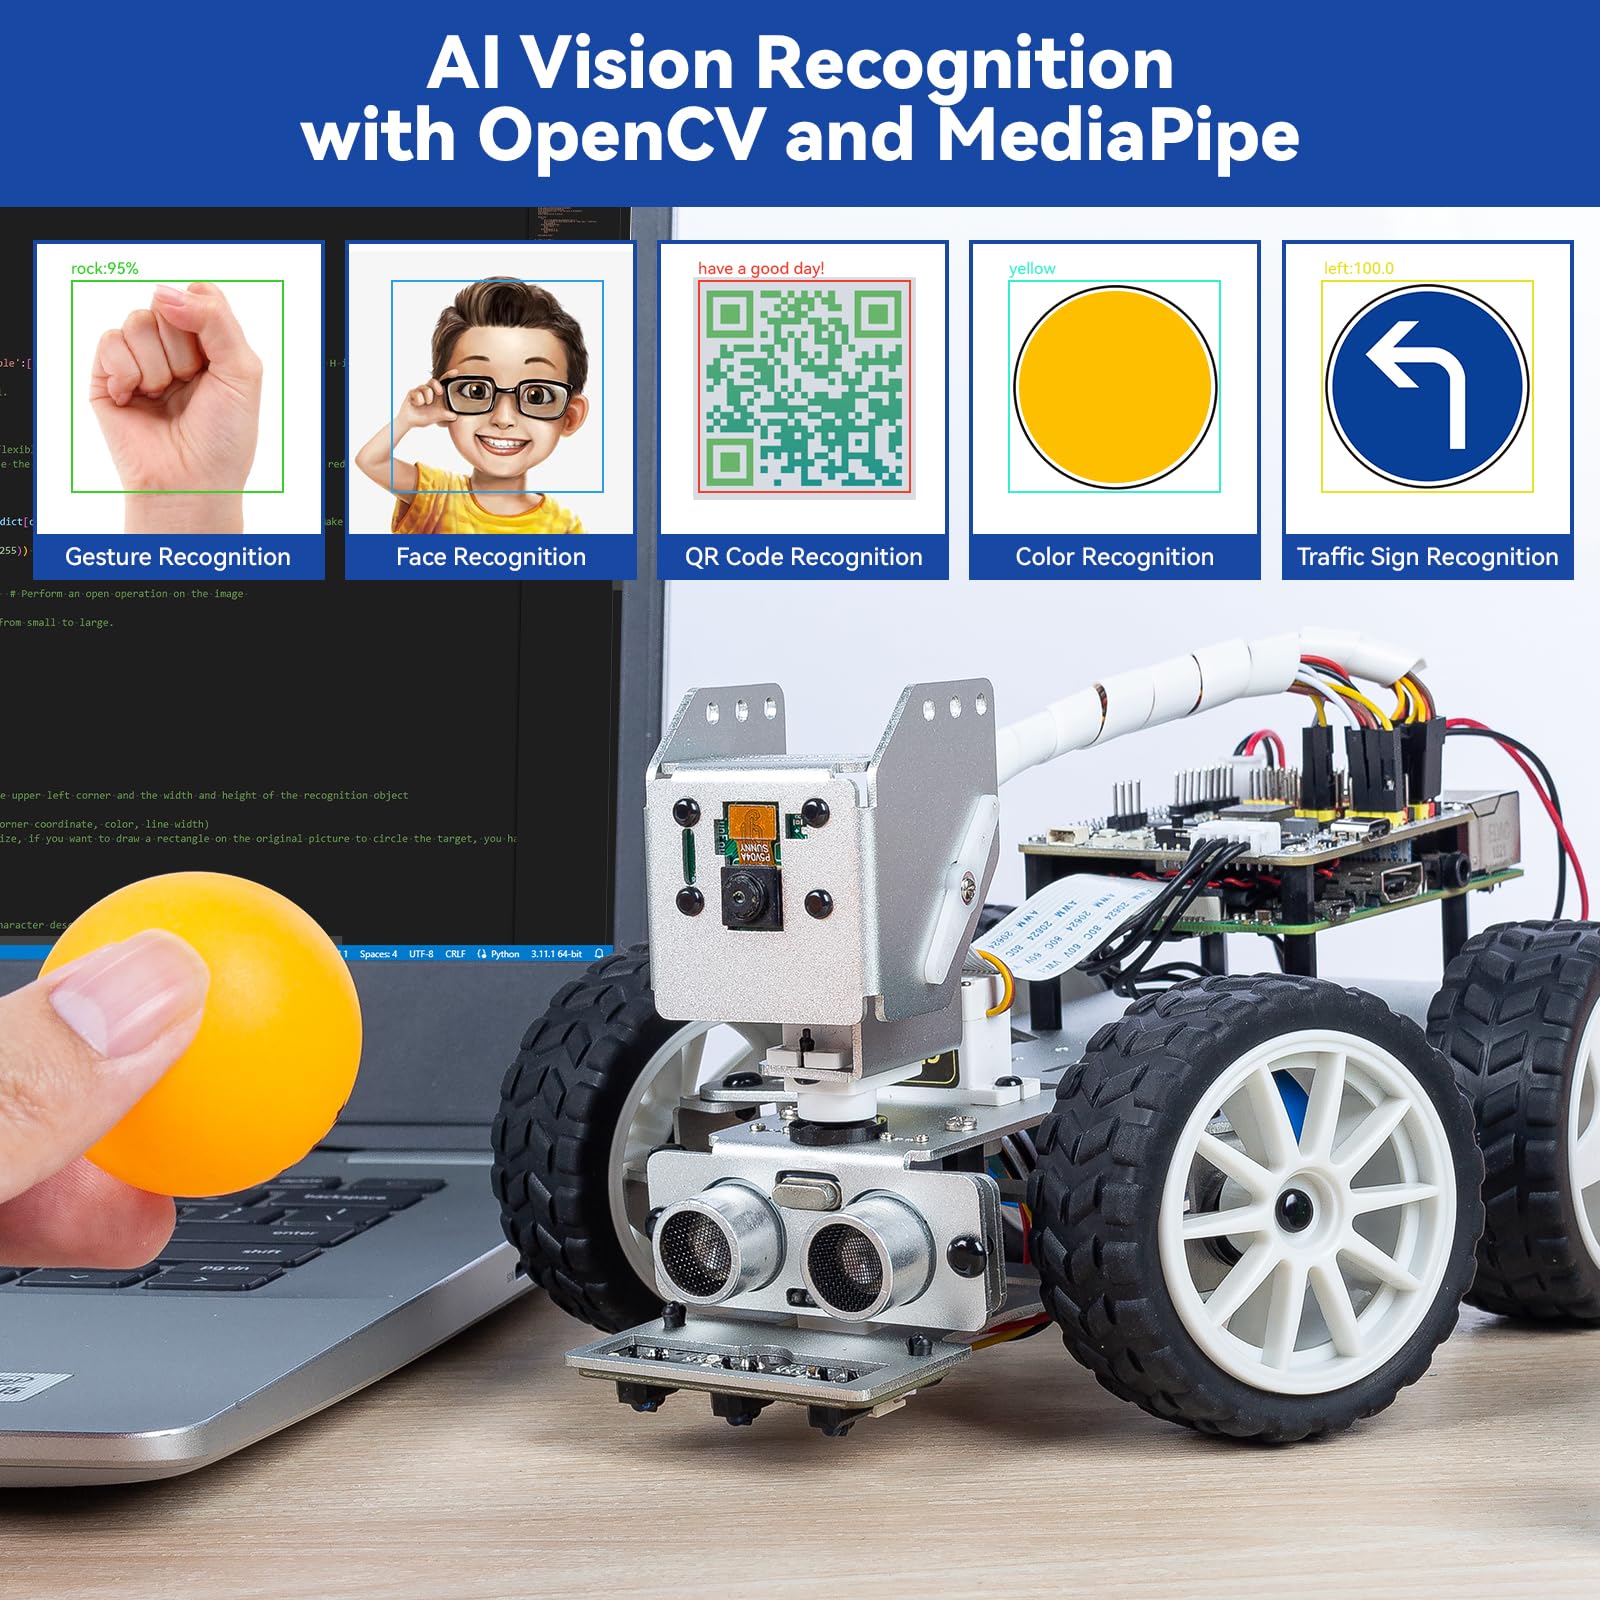
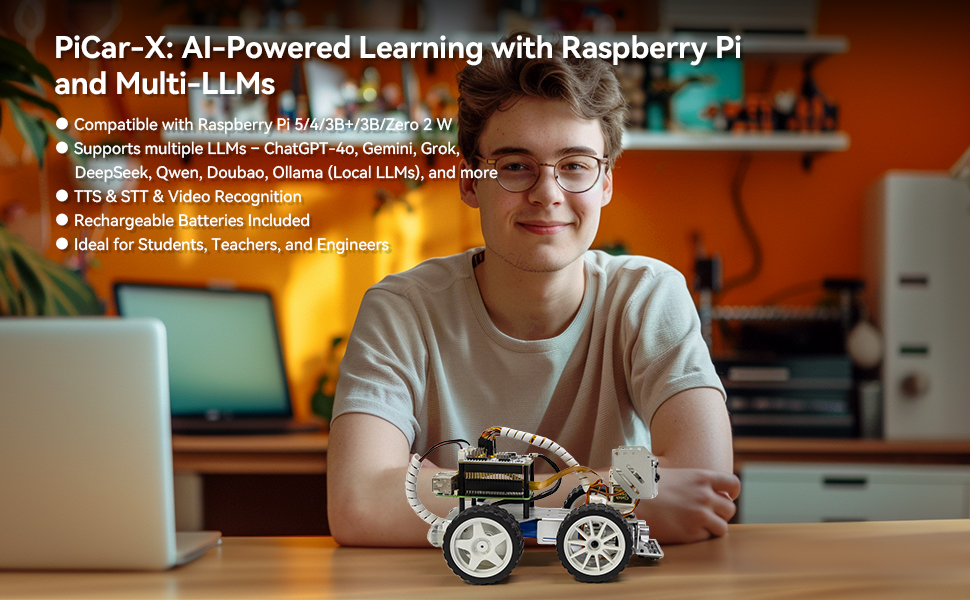
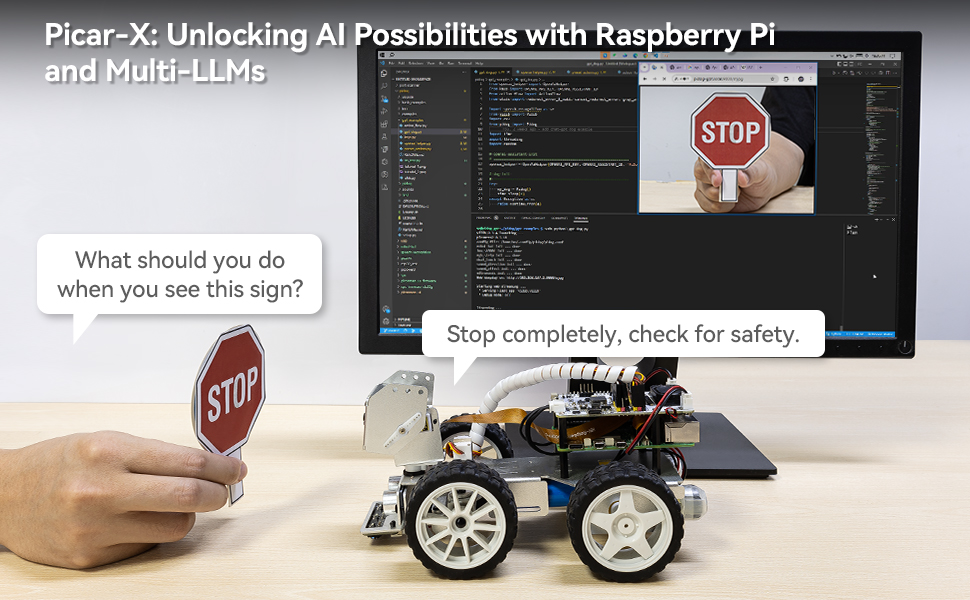
PiCar-X is an AI-powered smart car kit designed for Raspberry Pi (not included) that integrates multiple large language models including ChatGPT-4o and Gemini. Equipped with a high-definition camera, OpenCV, MediaPipe, and TTS/STT capabilities, it offers advanced AI vision and voice interaction. Ideal for students, educators, and engineers, it supports Python and Scratch programming, features modular hardware for sensor expansion, and comes with rechargeable batteries and comprehensive assembly support, making it a versatile platform for exploring AI, robotics, and machine learning.


| ASIN | B0CGLPF29H |
| Age Range Description | Youth, Adult |
| Battery Description | Lithium-Ion |
| Best Sellers Rank | #61,128 in Toys & Games ( See Top 100 in Toys & Games ) #624 in Educational Science Kits |
| Brand Name | SunFounder |
| Customer Reviews | 4.2 out of 5 stars 239 Reviews |
| Educational Objective | Programming Skills |
| Is Assembly Required | Yes |
| Item Dimensions | 10 x 6.5 x 4 inches |
| Item Weight | 798 Grams |
| Manufacturer | SunFounder |
| Manufacturer Minimum Age (MONTHS) | 180.00 |
| Manufacturer Part Number | CA New Pi CAR X |
| Manufacturer Warranty Description | 1 Year Guarantee |
| Material Type | Aluminum |
| Model Number | PiCarX |
| Size | 6.5 x 10 x 4 inches |
| Theme | Robotics |
S**K
A fun kit to build - and it actually works!
This robot car kit was lots of fun to build, and now I'm using it to practice python programming and TCP data communications. It brought back the fun I had as a kid building Heathkits. But unlike those kits, once you're finished building this robot car, you can make changes and improvements. The hardware has extra pins where you can attach new sensors, actuators, etc. For example, I'm planning to put some cheap radar sensors (RCWL-0516 which are less than $2 each) on my robot to supplement the ultrasonic sensor that it comes with. The robot software is also easy to "hack" (modify). This would be a good project for a child who wants to learn about electronics and computers, but they should have an adult (with some technical experience) nearby to supervise. There are some tiny parts, and some (like ZIF connectors) are delicate, so you need to be careful. But it comes with good instructions (printed and on-line) and screwdrivers. (You have to supply the Raspberry Pi.) Definitely a good project, and I'm amazed at the low price. It was an excellent way for me to use the Raspberry Pi 3B that was sitting in my drawer.
T**R
Works as Expected. Note PiZero 2W and Pi 3 related experiences.
UPDATE: This review is a record of my experience over the past month since my purchase. The examples under section 'Think Talk ... AI Powered with LLMs' will require at least a Raspberry Pi 3/3B. The installation steps work on Pi3B as good as it works on PiZero 2W. Minor fixes will need to be made for the camera to work. Once you have the Pi3B setup, examples such as '19. Voice Car with Ollama' work great. In my case, Ollama runs on a different computer on the same network, and therefore the Pi is not burdened to host any AI model. The aforementioned example works beautifully. I'm amazed how fast the response is for such a tiny setup! I did reach out to support with several questions, and the support person was extremely patient and helpful and responded to even my most basic questions that I could have googled. I truly appreciated her for staying with me along the way. Prior to this purchase, I bought a kit that was nearly three times as expensive, but that kit did not live up to my expectations. This kit has really come through! This does not mean the PiZero 2W is not entirely useful. All base examples work fantastic as long as you don't use speech to text examples with streaming enabled. The PiZero 2W is definitely a great starter for tight budgets. -------------------------------- Original Review --------------------------------- Let me start backwards. I have the kit put together. Most code samples as described in Sunfounder's documentation work really well. Especially, the facial recognition example. I pointed the camera at my TV from across the room, and I was impressed that it was able to recognize a single frontal faces clearly visible on TV from across the room. Pretty impressive! Similarly, photo capture, stare at face, keyboard control and video car examples worked without any issues. IMPORTANT TO NOTE especially if you are using the PiZero 2W. If possible, the following order is recommended from experience: 1. For heaven's sake, don't jump in and fully complete the assembly! 2. Instead, flash the firmware first - go with Raspberry Pi Trixie (the version described in the Sunfounder docs has been removed from the Pi Imager). 3. Once installed, ensure you can boot with a mouse and keyboard, and the PiZero 2W can connect to WiFi . Test connection to the pi over SSH and ensure it works. 4. Follow the online instructions and fully update/upgrade the Pi and install all the PiCarX modules completely! The Sunfounder online instructions are excellent and work as listed. 5. Connect to your pi from SSH and ensure you can launch the "center servo" example without errors which will help you below. NOTE: Connecting the Pi to monitor and keyboard after full assembly is difficult- at least without disassembling the PiHat from the Pi! 4. Do not follow just the paper assembly instructions alone. Keep the online instructions handy . Center the servos as described in the online instructions and assemble them as described in the online instructions. NOTE: Centering the servos after full assembly is really painful otherwise! TOP TIP: Make sure that the servo arms are secured properly to the body. The little self-tapping screws are too small and you will need to screw them in fully to attach the plastic servo arms to the frame. Otherwise, you risk them coming off the frame when you attach the servos. As of now, I have calibrated the pan, tilt and steering servos and run the audio tests following Sunfounders online docs. I still need to calibrate the grayscale sensor and hookup the Ultrasonic sensor. I'm able to run the robot around and watch the camera streaming on my laptop. To me the computer vision and AI examples are priority as opposed to line following or Ultrasonic sensor functions. Maybe I'm missing or overlooking something but there is no specific instruction to charge the battery pack or what specific charger is to be used.
S**S
Terrific, but kind of complicated
Cool kit. Lots of small parts. I still haven’t put this together and bought a Makeblock robot instead which is much easier to assemble,although I kept this one.
A**N
Fav purchase
Amazing content and lessons paired with the Pi Car x. You can spend a lot of time working on it and even then learning new commands and how to write scripts and understand the pre written ones. Website has lots of great content and would 100% recommend!
T**H
Missing cable
Says works with raspberry pi 4 but only has camera ribbon cable for pi 5. Build on hold until I get another $10 cable. Hope this is the only issue. UPDATE , my apologies , another cable was in the box. Got a quick response from vendor to resolve just from my review. Everything went together with no problems. I also added a mount and a small Elecrow 5" touchscreen on top. All the Sunfounder You tubes videos from Robojax also a big help. It took a lot of time to do it but I'm new to python and all the AI software. Learning a lot and hope to get grandkids interested it it
D**C
project went as planned 2 Wheel Dr. car
This project is not very fun. If only the pie car could support AWD and wheels. it’s a good beginner project I suppose
D**D
Upgrade the Pi
Get the car without the Pi Zero 2 W and buy a more powerful Rasperry Pi if you plan to primarily use EZ Block Studio. I upgraded to a RPi 5 4gb from the Zero 2 W, and the improvement was dramatic. It went from laggy to very responsive. The camera does poorly in low light, but you can slap a small flashlight on the head temporarily. I’m going to look for either a better camera or rig the thing with a controllable LED. As far as the build goes, the tutorial is straight-forward and well-documented. I think it took ~3 hours of relaxed work to get it assembled, the OS flashed, and the packages installed. My son and I have barely scratched the surface of the car’s functionality, and I’m excited to get further into it.
A**L
Confusing Instructions but Functions well and Sturdy
Bought this for my 15 year old son’s birthday. It seems to be really good quality. My son is pretty tech savvy and says it functions well though he says the instructions are really confusing on putting it together and using it with his raspberry Pi. He feels younger kids would definitely need an adults help.
Trustpilot
2 weeks ago
1 month ago