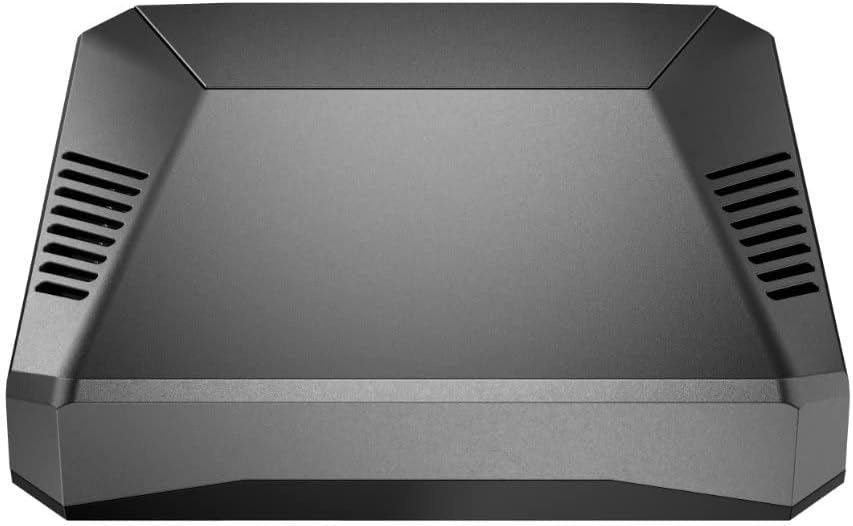


🔥 Cool, Clean & Commanding: The Ultimate Raspberry Pi Case Upgrade
The Argon ONE V2 is a premium aluminum alloy case for Raspberry Pi 4 Model B, featuring dual full-sized HDMI ports, a built-in IR receiver, and a smart cooling system combining passive heatsink design with a software-controlled 30mm fan. It offers a power button with safe shutdown and reboot capabilities, rear port layout for minimal cable clutter, and easy access to all GPIO pins under a magnetic cover. Designed for retro gaming, media streaming, and advanced projects, it boosts performance by reducing CPU temperatures up to 25°C, enabling overclocking and quieter operation.


| ASIN | B07WP8WC3V |
| Best Sellers Rank | 98,856 in Computers & Accessories ( See Top 100 in Computers & Accessories ) 10,467 in Components & Replacement Parts |
| Guaranteed software updates until | unknown |
| Item model number | B07WP8WC3V |
| Manufacturer | Argon Forty |
| Package Dimensions | 10.9 x 9.8 x 3.9 cm; 210 g |
E**B
A really great case for a Raspberry Pi 3
For some time I've been looking for a better case for my Raspberry Pi 3 Model B+ than the typical plastic offerings. In particular, I wanted significantly better cooling (like many people I'd fitted a small aluminium heatsink, but frankly it did very little to help cool the CPU), and if possible a power button. While researching the various options, I came across the Argon ONE case which appeared to offer all the items on my wish list and more (although see my comments on the power button below). I came across various reviews of the Argon ONE on the Web, but many of them just focused on unboxing and assembly, and even the better ones missed out some key information - so I've provided a fairly lengthy review which I hope people will find useful. The key features of the Argon ONE case are: - Passive and active (temperature-controlled) cooling - Power management including a power button that provides: on, off, reboot & forced power off - All ports are available on the rear of the case - Full access to all 40 GPIO pins (including the power pins normally used by a fan) - Status LEDs visible from the front of the case. The case comes in a small, fairly elegant looking black cardboard box, which fits the case exactly. Upon opening the box, all you will find is the case itself (wrapped in a soft plastic bag) and a small, well produced user guide. The box is made of thin cardboard so it doesn't offer much protection to the case, but since this box will typically be sent inside more robust packaging this shouldn't matter. Also, it's good to see that there was absolutely no superfluous packing material used. When you take the case out of the plastic bag, you find that the case itself consists of an aluminium top and a plastic base. Inside the case, there are a couple of small anti-static bags. One bag contains a small daughter board (more of which later) and the other contains various items used in assembling the case (4 small flat-head engineering screws, 4 longer round-head engineering screws, two small thermal pads and a set of self-adhesive rubber feet). It was really nice to see that the user guide was quite well illustrated and written in pretty good English so that it generally provided clear instructions. However, it did miss out some key information at a couple of points: it says to attach a "Silicon thermal pad" but doesn't say why there are two thermal pads to choose from nor which pad should be used when. For people familiar with the differences between the Pi 3 B and Pi 3 B+ that's not a problem (the thicker pad is for the 3 B and the thinner pad for the 3 B+) but for newcomers to the Raspberry Pi it could prove confusing. Similarly, there's no mention of attaching the self-adhesive rubber feet - but again it's obvious how and where to fit them. Assembly is actually quite straight forward and well illustrated in the user guide: - Connect the small Ar1 daughter board to the Pi (the Ar1 replicates the HDMI and audio/video sockets so that they line up with the - - Ethernet and USB ports on the back of the Pi). Connecting the Ar1 requires a bit of force but it is important to fully insert the plugs into the Pi sockets - just take your time and be careful - Attach the appropriate thermal pad to the heat sink on the aluminium case top - Plug the Pi/Ar1 assembly into the aluminium top case by inserting the Pi's GPIO pins into the socket on the case and then secure the Pi and Ar1 to the case with the 4 small flat-head screws - Complete the assembly by attaching the plastic base to the aluminium top using the four round-head screws, and attaching the small rubber feet. After this, simply power on the Pi (at which point you'll notice that the base is actually made of dark transparent plastic that allows the Pi's power and activity LEDs to be seen from the front of the case), follow the simple instructions for installing the scripts which manage the power button, fan speed configuration and uninstall of the software if needed - and after a reboot you're ready to go. The power button functions work as expected, and in particular, shutting down the Pi with the power button really does do a full power shutdown, i.e the OS shuts down and the Pi's red power LED goes out. However, I was tempted to drop my review down to four stars because with my case at least, the power button is a somewhat unreliable or perhaps over sensitive regarding power on and reboot - but it does eventually work so I decided to leave the review at five stars. The problems I've experienced are that it inevitably requires several tries in order to power on the Pi, and I also have to get the timing of the double-click for reboot just right before it will activate. That small disappointment aside, one of the great things about this case, is that the power adapter is actually plugged in to a Micro-USB socket attached to the PCB inside the top of the case rather than directly to the Pi - so in addition to supporting the power button, the Argon ONE provides managed power to the Pi and the internal fan which also supports thermal monitoring of the CPU to control the fan speed. It's important to use a strong enough power supply in order to provide sufficient power for the Argon ONE itself plus the Pi - and the recommendation is to use a 5.25V 3A power supply (note the voltage of 5.25V rather than 5V). Although Argon themselves offer a suitable power brick, all the pictures show it having a US plug, and there was nothing that indicated that the one supplied by Amazon UK would have a UK plug. So, rather than take the chance, I purchased a suitable power supply separately from the Amazon site. Another great feature of the Argon ONE is that unlike with most other cases with cooling fans, fan power is not supplied by connectors attached to Pi's GPIO pins, but is supplied directly by the Argon ONE's PCB itself - which in turn means that all 40 of the Pi's GPIO pins are available for use. The Pi's GPIO pins are actually exposed as a set of pins hidden under a magnetically attached cover on the top of the case. Also, these pins are colour coded as well as being labeled on the case - but as they are slightly recessed, it will probably be necessary to use an extension block/cable in order to use them. To check on the effectiveness of the Argon ONE's cooling, I ran some sysbench tests with the Pi installed in a standard plastic case (with a small heatsink on the CPU) and then again with the Pi installed in the Argon ONE. I ran two sysbench tests with the Argon ONE - the first using the default fan speed configuration and the second with a customised fan speed configuration (customisation can be easily done using a supplied script which is accessible as an icon on the Pi desktop). With the Pi in the standard plastic case, the CPU temperature settled at around 75C - which means the CPU was heat throttling and its frequency was reduced from 1.4GHz to 1.2GHz. With the Argon ONE and the default fan speed configuration the CPU temperature settled at around 55C and with the custom fan speed configuration, the CPU temperature settled at around 50C. This reduction in CPU temperature has a direct effect on processing speed, and on average, the sysbench tests run on the Argon ONE were 16% faster than those run with the standard Pi case. Best of all, I then overclocked the Pi to 1.55 GHz, ran the tests again, and got a further 10% improvement in performance. So, with the Pi running in a standard plastic case, the test ran in 270.31s with a final CPU temperature of 75C, and in the Argon ONE with the Pi overclocked to 1.55 GHz, the test ran in 209.10s with a final CPU temperature of just under 55C - an overall saving in run time improvement of 61s or 23%. Some final comments: The Argon ONE case looks great, and I really like having a "mini desktop" Pi where all the cables plug neatly into the back of the case rather than having cables coming out of three sides. There is a small drop in WiFi signal strength, but this was not a problem for me as the Pi still achieved a good signal strength and wireless speeds that would support several HD video streams at the same time. There are IR headers on the Argon ONE PCB, and although they are not currently enabled, this feature will hopefully be made available in the near future. Finally, it's not lost on me that the Argon ONE case and power supply (when bought from Amazon UK at least) cost more than the Pi 3 B+ itself - but in my case I was happy to spend the money in order to get the features provided by the Argon ONE.
A**X
Great cases, the v2 is better than original, well built
Great and quality cases for the pi 4 - unobtrusive, compact, nice labeling for the GPIO and other pins, and a much better configuration for the Pi for the other ports. I have several of these now and just got a v2 which I prefer as has full sized HDMI sockets, supports some infra red remotes (including their own) and you can force to power on automatically now via jumper inside the case which the original couldn't do, for example if power loss it couldn't boot up again without pressing the power button which could be an issue depending on what you were using for. Due to the relocation of the GPIO and other pins do check if you are using any HAT's if they will still fit though, you may need a ribbon cable to relocate those, and several of the pins are used for the fan control as far as I'm aware. Runs pretty quiet with the fan on, which with their script you run is software controlled - but you'll be totally silent if under 55 degrees (or if you've not installed and configured their fan controller script). The top half of the case is metal so acts as a heatsink, so you may not even have the fan in use depending on the temperature of the pi - lowest temp it can kick in is 55 degrees, depending on settings you use. The WiFi and bluetooth do still work as the underside of the case is plastic, though obviously not quite as well as if you were using a plastic case, but not been an issue for me. There is another version they make (of the original) with an MVME slot and also a separate MVME upgrade which fits underneath (for existing) and connects to one of the USB ports, although apparently that ONLY supports SATA MVME drives and can be issues powering with the official power supply not being powerful enough, though a common issue with additional drives especially if not SSD/MVME.
J**H
Wonderful little case that makes connections much neater
The Argon One case is a beautiful design and the conecpt is very good. Removing the cover to the expansion socket is easy and is aethetically done. I had a problem when it first arrived, that although the Raspberry Pi 3 B+ board started up and LEDs showed it was powered, there was no output on HDMI. Removing the audio/video adapter and connecting the HDMI directly to the board caused it to work. I therefore contacted the seller who promptly answered. But I noted that the low voltage popup was showing in Raspian even connecting directly to the HDMI socket on RPi. I found the problem was the stock Pi 3+ power supply, does not supply enough voltage to power the fan and circuitry that feeds the Pi in the Argon One. I noted that in USA there was a 5.25V PSU available for the Argon one, which is not available in UK. I found another 5.25V 3A PSU on Amazon from a reputable company and bought that. The Pi now works perfectly inside the Argon one case with the HDMI connected correctly. The issue is that there is a voltage drop over the PSU cable and then a further voltage drop on the Argon One power board, which took the voltage below 4.75V. The voltage is now almost exactly 5V at the board with the 5.25V PSU connected and is working without the low voltage warnings. You need to be careful because the tolerance on most PSU's would mean that you could operate outside of the Pi Voltage tolerance and damage could occur, but in my case it is fine. I now have a beautiful little device that fits the environment it is in, with no cables showing. I will probably buy another one for my weather station device. I should have deducted 1 star for the PSU issue, but I was impressed by the quick reply from the seller, even though I managed to find the actual issue myself. I also note that Raspberry Pi also supply a 5.1V PSU, so thes must be a common problem, not just with Argon One.
O**T
I was suprised by the quality of the parts. The top of the case is aluminum which serves as a heatsink and comes with silicone thermal pads. There are two daughter boards that serve to reroute the GPIO and hdmi/audio which seem of very good quality. ( nice components, nice welds without burns or traces of flux ) Also included are four stick-on rubber feet. I had a very small fitment issue where the boards are off by a tiny bit but this doesn't interfere with the port openings it just meant i had to squeze a bit until i had put the screws in. I belive this is the cause for the second very small problem, that the case doesn't sit flush and has a slight wobble. These small issues aren't enough for me to remove a star from this product. 9.9/10 Would definitely reccomend.
T**L
This is a very well thought-out case that works extremely well. The only thing lacking is easy access to the camera CSI slot and display slot -- more on that at the end. But it's still so much better than every other case I've used (and I've used quite a few) that I couldn't give it less than 5 stars. The case is three main pieces (and some internal pieces): The bottom is plastic (tinted but transparent -- you can view the power & activity lights). It has a opening to provide access to the microSD card slot. The main body is a aluminum alloy casting. It has vent slots in it for airflow, but it also has a couple of blocks that are designed to press to the CPU and memory and includes thermal pads. This allows the Pi to transfer the heat to the entire case to provide passive cooling. The passive cooling works *extremely* well! The case has a variable speed fan and comes with software that changes fan speed based on temperature. The default is to use no fan if the Pi is less than 55°C. At 55°C it goes to 10% fan. At 60°C it goes to 55%. At 65°C it goes to 100%. But you can set these to any temperatures and any speeds you want -- it is completely customizable. While I've tested the fan to make sure it works... the case does such a good job dissipating heat naturally through the thermal pads and blocks that transfer heat to the case body ... that my Pi generally never gets above 40°C (I'm using a Pi 4B/8GB). I ran a stress test to peg all 4 CPUs to 100% and after about 10 minutes it finally managed to reach 51°C.... and still never made it to the 55°C temp that would have triggered the fan. As I write this, my Pi is sitting at 36°C and the case is moderately warm because all the heat is transferred to the entire upper body of the case. So I'd say the heat management on this thing rocks! The third part of the case is a magnetic cover for the GPIO pins. The case plugs into the GPIO on the Pi and re-routes the GPIO to the back/top of the case under the cover. When the access cover is removed, the new GPIO header color codes the pins and also provides labels -- making it very easy to find the pins you want. The case also has an internal custom board that plugs into the side of the Pi to connect to power, both HDMI ports, and audio ... and re-routes these to the rear so that *all* cables connect at the back of the Pi making for a much cleaner look -- especially if use the Pi as a desktop. There is an internal board (pre-installed) that has the fan and also re-routes the GPIO access. Lastly, the case has a power button and software that comes with the case monitors the button. A single tap will power up the Pi. A double-tap will reboot it. Holding it for 3 seconds will do a nice shutdown and then cut power. Holding it for 5 seconds will do a forced shutdown (cutting power without waiting for an orderly shutdown). The *only* thing this case doesn't offer is any type of access to the display or CSI camera slots. There actually *is* a slot visible when you remove the magnetic GPIO cover ... and it looks like you could probably manage to route a ribbon cable through this -- but it would need to be done before you assemble the case. I did not actually try this. If you are not using a Raspberry Pi camera that uses the CSI ribbon cable slot or the display that uses the display ribbon slot, then this is definitely the very best case I've used. If you are using either of those two slots, you might want to try a different case.
B**N
I had in my mind that this case would be somewhat bigger than it actually is. Perfect well made little case and everything fitted together nicely. Just beware of the pins used by the case for the power button and fan control as the power button uses the same GPIO as the default 1-Wire GPIO pin and the fan uses the I2C bus. The 1-Wire pin can be changed in the Pi’s boot configuration and the I2C bus supports multiple devices so it wasn’t a deal breaker. The Pi runs much cooler now due to the heatsink being integrated into the case which makes for a larger cooling area and I find it is running some 8-10 degrees cooler even without the fan running. Beats any of those stick on heat sinks hands down. My setup is running Docker with Portainer that is running multiple containers of Node-Red and Grafana. It’s yet to break a sweat and have the fan kick in which starts at a default setting of 50C.
J**N
Best case for Pi3 for desktop or media cebter use hands down.
D**X
Çok memnunun. Öneririm.
Trustpilot
2 weeks ago
1 month ago