


🏡 Elevate your garden game with the ultimate heavy-duty storage haven!
The Lifetime 60079 Outdoor Storage Shed combines rugged dual-wall HDPE construction with steel-reinforced trusses and a high-pitched roof for superior weather resistance. Featuring dual-entry doors, a slip-resistant floor, and a full-length skylight, this 21.1 m³ shed offers a spacious, well-lit, and durable workspace designed for professionals who demand both style and function in their outdoor storage solutions.


| ASIN | B00CTVQ6UG |
| Base Material | High Density Polyethylene (HDPE) |
| Best Sellers Rank | 72,824 in Garden ( See Top 100 in Garden ) 252 in Garden Sheds 70,199 in Gardening (Garden) |
| Brand Name | LIFETIME |
| Chamber Depth | 8 Feet |
| Chamber Height | 7.9 Feet |
| Colour | Tan |
| Country Of Origin | USA |
| Customer Reviews | 4.2 4.2 out of 5 stars (563) |
| Door Height | 191.5 Centimetres |
| Door Style | Double Door |
| Door Width | 148 Centimetres |
| Floor Area | 10.1 Square Meters |
| Frame Material | Alloy Steel |
| Global Trade Identification Number | 00081483011257 |
| Included Components | Tools |
| Is Assembly Required? | Yes |
| Item Dimensions D x W x H | 2.44D x 4.57W x 2.44H metres |
| Item Type Name | 15 Ft. x 8 Ft. Dual-Entry Outdoor Storage Shed |
| Item Weight | 320 Kilograms |
| Manufacturer | Lifetime Products |
| Manufacturer Part Number | 60079 |
| Manufacturer Warranty Description | 10-Year Limited Warranty |
| Material Type | Alloy Steel, High Density Polyethylene |
| Model Number | 60079 |
| Style Name | Outdoor storage shed |
| Top Material Type | Polyethylene |
| UPC | 081483011257 |
| Ultraviolet Light Protection | uv |
| Unit Count | 1.0 count |
| Water Resistance Level | Water Repellent |
| Weight Capacity Maximum | 2268 Kilograms |
M**E
Delighted
Great investment. Looks fantastic. Loads of space inside. Stylish design. Two double doors and floors included
K**.
Stylish shed looks gorgeous
It’s well worth the money
K**Y
Ok
She’d came with 2 missing parts and instructions were all messed up , most part of building was trying to find the right page with the right parts etc nightmare ! , when rains the floor leaks and is not water tight , nice windows and doors and over all look is nice
J**E
good
Very nice sheld, very good rainproof effect
A**R
Great shed
What a great shed took me in the wife about one day to erect instructions are a little tricky but go on the internet and watch the build on YouTube really impressed would recommend
M**R
Not worth the money
Flimsy
C**N
Large shed
It’s a good sturdy shed
B**R
There was an ancient, rusted, warped, eyesore of a metal shed on a 10x10 concrete pad that needed to be replaced as part of the "make this yard beautiful” plan. We spent a good while searching local stores and the internet before stumbling upon the Lifetime 10x8 Shed on Amazon.com (model 60393). It had the space we wanted and the physical appeal we were hoping for. Isn’t it so darling with those windows and that gable?! The option of getting it in either cool gray tones or warm tan and brown tones is a nice bonus to best pair with any home color. We chose the latter. When we ordered it, the expected delivery date was 16 days out. Two days later I received a notice that it was going to arrive after just 10 days. But then I was happily surprised when five days after placing the order, it was suddenly out for delivery that day. Thankfully I was ready to get this shed assembled. One thing you should note is that this shed will not be brought by an Amazon delivery vehicle. It came via a freight company, on a long wood pallet, and between the pallet and the two huge boxes on it, it weighed close to 600 pounds. My life was going to be a lot easier if the delivery person would be willing to bring it to the backyard rather than drop it off on the driveway. So I put together a plate of cookies as a sweet thank you/bribe/incentive for the driver, and it worked! The two of us pushed and pulled that huge long heavy load around to the back patio with his special hydraulic fork lift dolly, and that driver’s act of kindness alone saved me so much time and energy. Because friends, it’s blazin’ hot here right now. And whilst I’m fairly wiry and capable, I’m also a grandma who’s knocking on her sixth decade. I greatly appreciated the help. The shed comes in two huge boxes that are the same size. They’re wrapped in plastic on the aforementioned wood pallet. My recommendation is that you have a large space ready to assemble your shed prepared in advance. Having a table to work on will make it more comfortable, and having all your tools at the ready will simplify this project. If you don’t have power tools (especially a phillips screwdriver and a bit to use with the socket ratchet wrenches), buy or borrow some. You’ll be so glad you did. I opened the top box - NOTE, the cardboard box tops and bottoms just fold and tuck in as you can see on the photo I’ve included, so when you easily untuck it, it opens up into a huge flat sheet of cardboard, which makes a really nice surface for laying out pieces and parts on while you’re working on this. The instruction manual was on top. It was high noon and 96º and sunny, so I took it inside, scanned the QR code for the installation video on YouTube, made a sandwich and ate it while I watched the video (45 minutes long). That was very helpful to gain a sense of what was ahead. HIGHLY RECOMMEND you to do that if you’re a novice like me. My whole assembly process was a dance between referencing the paper instructions to help me locate the correct components, and watching the video instructions for how to install it. NOTE: the video does not start with delivery or include unboxing and finding where everything is. It just smoothly flows from step to step without any hitches, which is why it takes just 45 minutes to assemble. It was a full day project for this grandma. If I were doing the process again, here’s what I wish I’d known and what I would have done: You must have a flat level pad…just know that starting out. It does matter. You don’t want it to be off-kilter or misaligned at the end. Concrete is recommended. Alternatively, you can use their assembly instructions to build a wood base from materials you purchase. I had a concrete pad which I verified was level and was so glad about that. Despite watching the installation video, I didn’t read the paper assembly instructions before I started. The video always shows what step they’re on, and I would just reference that page in the paper instructions. Because of this, I never looked at a few yellow pages inserted into the middle of Step 7 of the paper instructions. These yellow pages are the complete parts list and they say “Remove this section for quick reference”. I thought all the metal parts were in the top box (box 1). Not so. Some of the parts you need right away are in the bottom box (Box 2). You’ll need to have ample space to unpack both boxes to access everything as needed. I recommend watching the installation video, then lay everything out in groups and get organized. Finding parts for each step took me a lot of time. First you’ll assemble or attach hardware to several things. The trusses, the gable, the doors. I did all these steps by myself. Having a second person finding parts and handing them to you as you go would save a lot of time, but it’s not strictly necessary. One person can easily get all the way through Step 5 without help. When you start Step 6, Flooring, that’s when having a second person begins to matter. And by Step 7, Wall Assembly, you definitely want another person to help. Fortunately my husband got home from work right when I got to this point and we made good progress. A few steps could have been done alone once the walls were assembled, but again, it’s helpful if there are two people doing this. I made a few rookie mistakes during assembly, but had a great experience messaging with LIFETIME LIVE CHAT online. So helpful and proficient. They got me sorted out. Real human phone call support is also available during set hours if you prefer that method. Once you finish assembling the shed, don’t skip the anchoring to the concrete or wood base step. You don’t want to get all the way to the end and not anchor it before using it. We picked up the recommended supplies at the hardware store to anchor it down. As you can see from all the pictures online, this shed is very beautiful and spacious. We could not be happier with it. We love that it is Made in America. Following the instructions, we were able to assemble it without any issues. The doors line up perfectly, open and close easily. The windows and skylights let in natural light. The shelves along both sides are a nice addition to the ones we’ll be putting in there to hold items and add stability to the shed. The vent holes on either side allow for some air flow but keep bugs out with the mesh screens. The 72” door height is great for us. Our concrete pad has a concrete ramp, which will make rolling things in and out convenient. The door is lockable from the outside with a padlock. If you’re looking for a quality shed that will not rust and will be an attractive addition to your space, this one is worth every penny.
M**L
The shed turned out so well I am thinking of moving my mother-in-law into it. :-) Seriously, it’s a very nice looking shed and functional. Most sheds are eye sores. This shed brings the backyard to life. Install was a little challenging. It took two of us two full days, with breaks. We found the online videos a good supplement to the manual. All the parts are well labeled. It was like building a life sized erector set. We kinda enjoyed it. After it was finished we were missing a door latch. We called the 1-800 number and they shipped it right out, no questions asked. The material is sturdy. It won’t rot or rust. It will be interesting to see how well it will hold up in the FL heat, and if the tie downs will keep hurricane winds from blowing it away. That’s how we lost our last shed. My only advice is to build a level, solid foundation to put it on. The floor it comes with is very nice aesthetically, but it needs a wood or concrete base. All-in-all, a good buy for the money.
N**Y
Lots of room, good to have a second person with the walls and roof panels. Easy to assemble only took about 5 hours with power tools. Would recommend not using supplied butyl tape for skylights instead I used an outdoor white silicone for use on motorhome skylights and it is holding up great in a terrential downpour.
S**.
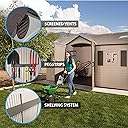
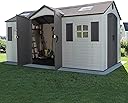
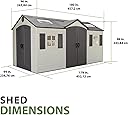
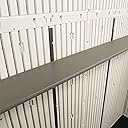
Was haben wir recherchiert und hin und her überlegt bei diesem Häuschen. Nach nun vielen Monaten nach dem Aufbau unseres Lifetime-Hauses, möchte ich einmal meine Eindrücke schildern, die vielleicht dem ein oder anderen Unentschlossenem weiterhelfen. Gerade weil auf Amazon sehr wenig und wenn dann durchwachsene Bewertungen zu den Lifetime-Häusern vorhanden sind. TL:DR: Das Chateau ist ein super schönes, wartungsarmes und großes Garten- bzw. Gerätehaus zu einem fairen Preis. Wir haben den Kauf nicht bereut und würden es wieder kaufen! Garten-/Gerätehaus: Bei uns kommt das Lifetime Chateau als Geräteschuppen zum Einsatz. Wir hatten vorher einen Holzschuppen, welcher viel kleiner war, einiges an kostenpflichtiges Zubehör brauchte und vor allem anhaltende Pflege benötigte. Das Chateau ist gut konzipiert, die schönen großen Doppeltüren machen es sehr angenehm mit Rasenmäher, Fahrrädern oder anderen sperrigen Gegenständen rein und raus zu gehen. Auch gefällt mir sehr, dass die Türen eine ausreichende Höhe haben. Man kann einfach durchlaufen ohne sich den Kopf zustoßen. Das kenne ich von meinem Holz-Schuppen anders. Hilfreich ist auch das Lichtband, welches ausreichend Licht hineinlässt und man sehr lange ohne zusätzliche Lichtquelle auskommt. Das Haus sieht ansonsten sehr schön aus, brauch sich bei einer präsenteren Platzierung im Garten auch nicht verstecken. Kosten: Der Preis auf Amazon schwankt immer mal wieder, es gab oft Phasen, wo das Haus ein paar hundert Euro günstiger ist und/oder zu 0%-finanziert werden kann. Die Summe ist natürlich auf den ersten Blick hoch, relativiert sich dann aber schnell, wenn man bedenkt, dass man nach dem Aufbau fertig ist. Theoretisch bedarf es nach dem Aufbau keiner weiteren Aufwendungen. Das war bei unserem Holzschuppen schon deutlich anders. Holzlasur, Farbe, Regenrinne, Blechdach, Sturmsicherung, separate Unterkonstruktion für den Holz-Schuppen. Das läppert sich dann ganz schnell. Und der entscheide Punkt meiner Meinung nach, wenn ich nach einem Holz-Schuppen in den Maßen schaue, dann zwickts aber auch ganz schnell im Geldbeutel. Die Kosten sind daher initial angemessen und fortlaufend unschlagbar meiner Meinung nach. Standort: Der Standort ist ein entscheidender Faktor. Bei uns steht das Haus überwiegend im Schatten, was gut ist. Vormittags steht das Haus eine gewissen Zeit in der Sonne und das merkt man schon an einigen Stellen. Die Tür, die zur Sonnenseite gerichtet ist, lässt sich merklich schwerfälliger entriegeln und bei geöffneter Tür sieht man, dass sich der Boden anfängt zu wellen. Ich könnte mir vorstellen, dass sich das Haus ggf. mehr verformt, wenn es einen vollständigen Sonnenplatz bekommt. Gerade für Leute, die planen es als Gartenhäuschen oder so zu verwenden, würde ich mit meinem jetzigen Wissensstand eher davon abraten - gerade weil auch mir dann doch noch die Langzeiterfahrung fehlt. Unterkonstruktion: Wie in vielen Videos gesehen und auch in der Anleitung beschrieben, wird eine Betonplatte oder Holzunterkonstruktion empfohlen. Wir hatten anfangs überlegt, das Gerätehaus auf eine Holzunterkonstruktion zu stellen, da vermeidlich günstiger und schneller. Kurzum, lasst das bitte. Es ist irgendwie quatsch, ein Haus aus Kunststoff auf eine Holz-Unterkonstruktion zu bauen, die dann wieder gewartet und gepflegt werden muss - man aber nie wieder richtig rankommt. Und auf die Holzimprägnierung zu hoffen, das war uns nichts. Macht eine ordentliche Bodenplatte aus Beton oder pflastert es aus. Die Maße sind exakt in der Anleitung vorgegeben, sodass man hier nichts falsch machen kann. (Wir haben dennoch etwas mehr Fläche geplant). Wichtig ist, dass die Fläche im Wasser ist. Abweichungen merkt ihr dann ggf. später bei den Türen oder Dachelementen. Bitte auf keinen Fall direkt auf Rasen, Erde oder Splitt stellen. Das ist zu 100% nicht von Dauer. Aufbau: Es gibt auf YouTube vom Hersteller einige Aufbauanleitungsvideos, die sehr hilfreich sind. Ich würde empfehlen, die vorher anzuschauen, um ein besseres Feeling zu bekommen. Die Anleitung ist zwar sehr gut beschrieben, aber es hilft, das alles schon mal gesehen zu haben - zumindest ging es mir so. Ansonsten bitte nicht von der Aufbaudauer in den Videos täuschen lassen. Ihr werden länger brauchen, viel länger. Anders als in den diversen Videos haben wir das Haus nicht mit einem Akkuschrauber aufgebaut, sondern per Hand verschraubt. Nach fest kommt lose und viel Spiel ist bei Kunststoff nicht. Wir haben für den Aufbau gute 2 Tage gebraucht plus kleinere Vor- und Nacharbeiten. Die Ertüchtigung des Untergrundes ist da noch nicht eingerechnet. Je nach Untergrund kommt dann noch mal ein halber Tag bis Tag dazu meiner Erfahrung nach. Was bei uns gut funktioniert hatte, die etlichen Vorbereitungen an einem Tag zu machen, den eigentlichen Aufbau an einem anderen Tag. Es gibt wirklich viel Kleinzeug vorzubereiten, Gestelle für das Dach, Stabilisierungsschienen für die Wände, Türen und so weiter. Rückblickend hätte ich die Krise bekommen, hätte ich die großen Pakete mit den diversen Tüten und Inhalten an einem Tag bearbeiten müssen. Aber da ist jeder anders und für Organisationstalente sicher gar nicht so schlimm. Was ich damit sagen will, ausreichend Zeit und mindestens zwei weitere Hände einplanen. Stabilität: Das Material fühlt sich insgesamt hochwertig an. Die Dachelemente bestehen aus sehr festem Kunstsoff sowie einer metallverstärkten Aufbaukonstruktion. Die Wandelemente und Türen hingegen sind eher dünnhäutig bzw. hohl. Was hingegen wieder sehr stabil ist, ist der Boden. Dieser ist aus Hartplastik, aber auch der gibt etwas nach. Umso wichtig ist daher der Untergrund. Trotz des Wissens, dass es sich um ein Kunststoffhaus handelt, war ich doch überrascht, wie dünn und labbrig die Elemente teilweise so sind. Man merkt zwar beim Aufbau, wie das Haus immer mehr Stabilität bekommt und sich auch immer mehr stützt. Aber auch nach dem Aufbau ist es dann - logischerweise - nicht vergleichbar mit einem Holzhaus. Die Wände lassen sich eindrücken und das Haus sogar verschieben im leeren Zustand. Das ist mir wichtig mitzuteilen, da ich das auf jeden Fall nicht erwartet hatte. Daher unbedingt die vorgegebene Verankerung im Boden durchführen. Wir haben dafür direkt Betonschrauben mit entsprechend großen Unterlegscheiben verwendet, im Boden vom Haus sind die entsprechenden Markierungen ausgestanzt. Was wir relativ schnell nach dem Aufbau gemacht haben, ist eine Holzkonstruktion mit OSB-Verkleidung im Innenbereich zu erstellen, die sich gegenseitig stützt und mit den Dachträgern (Winkel siehe Bild) verbunden ist. Diese Variante gibt's auch in einigen Videos auf YouTube und kann ich sehr empfehlen. Wichtig bei dieser Variante: Die Metallgestelle dienen als Regenwasserablauf. Wenn ihr da also reinschraubt, dann so weit oben wie möglich. Ansonsten leitet ihr das Wasser direkt ins Innere. Wir hatten auch schon einige heftige Stürme und das Haus steht nach wie vor an Ort und Stelle. Laut Beschreibung und vielen Videos muss es natürlich auch ohne diese Nacharbeit so sein, aber wir wollten auf Nummer sicher gehen. Entscheidender Pluspunkt ist auch, dass man innen dann auch nicht mehr allzu filigran vorgehen muss. Wenn dann mal der Spaten an die Wand (OSB-Platte) kommt oder das Fahrrad mal gegen ballert, dann passiert halt auch nichts. Außerdem erleichtert es ungemein weitere Anbringungen wie Regale, Werkzeughalter, usw. Platz: Der Platz ist natürlich Wahnsinn, Reifen, Fahrräder, Werkbank, Regale, Werkzeuge findet alles seinen Platz und man kann immer noch treten. Zusätzlich kann auch der Dachbereich noch als Stauraum genutzt werden. Das Chateau verfügt nun über zwei Doppeltüren, was natürlich den "Nachteil" hat, dass Stellfläche genommen wird. Für uns war das aber wichtig, da wir den Schuppen etwas aufgeteilt haben. Eine Tür führt zur Werkbank, die andere zu den Regalen, Fahrrädern usw. Das hilft uns bei der Ordnung. Eine Tür bzw. ein Eingang birgt auch immer das Potenzial, dass sich der Schuppen im Laufe der Zeit "zumüllt", man nicht mehr treten kann bzw. nicht mehr an alles rankommt. Diese Größe gibt es aber auch in der Variante mit nur einer Doppeltür. Fazit: Es gibt noch viel mehr zu beschreiben, aber ich denke, das waren so meine wichtigsten Eindrücke. Wir sind insgesamt durchweg zufrieden, auch wenn wie beschrieben nicht alles super ist. Das Haus sieht nach wie vor aus wie am ersten Tag. Es ist wirklich schön, einfach Platz, Ordnung und bezüglich Wartung und Pflege seine Ruhe zu haben. Wer noch weiter lesen und mehr Bilder sehen will, dem empfehle ich direkt auf die Herstellerseite zu gehen, dort gibt es hunderte bebilderte Reviews, wenn auch auf Englisch.
A**R
For such an expense, I read a lot of reviews. Many complained about the instructions, or the quality, or the stability. I'm sure if you have a heavy snow load or extreme winds, probably get something more solid. But for me it's been great. People who complained about the assembly: two people would help, but I'm 64 and built it myself, and only had difficulty with one panel when starting. It took a day and a half to complete it; it does help if you're handy with tools and a bit mechanically inclined. I built it on a concrete pad, but if the pad isn't completely level, you'll notice how it will affect the doors. I've had a couple of heavy rains, and it has remained dry inside. I've found that the doors are difficult to close at times, but not impossible. Because my pad wasn't completely flat, I did have a few difficult areas, but overall it's been great. I got the 8x15 size and it's already filling up. Pay close attention when putting the doors together, instructions are slightly misleading, and I did have one panel that was missing the indentations for the shutter on one side, but I improvised and got it installed.
Trustpilot
1 month ago
2 weeks ago