


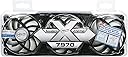
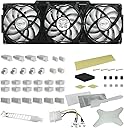

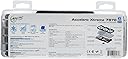
Arctic Cooling Accelero Xtreme 7970 Graphics Card Cooler
Product ID: 84286577
Outstanding cooling performance With a cooling capacity of 250 Watt The Accelero Twin Turbo III is perfect for medium to Hochklassige graphics cards. The Arctic NEW patented back side fan, the 92 mm PWM Double Fan and the Voraufgetragene 'Das schicke 4 Thermal Grease Paste Compound means the temperature of the GPU significantly – perfect for overclock Highest level of efficiency due to back side cooler For now impossible cooling services Arctic has developed a back side cooler and our patented. This allows the targeted and efficient cooling for RAM and voltage regulator, so the graphics card with more performance running. Installation without thermal conductive adhesive Now it has been the mühevolle application of ice packs using the thermal conductive adhesive required. This is thanks to the innovative back side plate's No Longer Needed. Without so that you can trim the video card easily and can be removed without leaving to their original shape back. Virtually silent The combination of 'Silent Fan Impeller and patented fan bracket means the Accelero Twin Turbo III practical threshold work even at full speed. Thanks to the PWM control the speed of the fan to the corresponding CPU temperature, so that the volume is reduced to a minimum. Multi Compatible The Accelero Twin Turbo III is versatile and easy to install and is compatible with a wide range of graphics cards. New Fan Control UnitImproved fan control and the use of additional filters ensure operation with NVIDIA graphics cards. Review: Super Size Super Cooler - I bought this cooler for use on a Sapphire HD6970 2Gb card. Removing the noisy stock cooler was very easy (see U-tube videos) it took about 10 minutes. Then as suggested by the instructions I cleaned the ram chips with a rubber erasure to remove any residue from the sticky pads. After which I used some Isopropyl Alcohol (IPA) on All the chips to be fitted with heatsinks. It's important to ensure the chips are clean before you stick the heatsinks on or they may fall off! Also do the GPU chip. You will find a vast array of heatsinks included with the kit, you wont need them all, just the ones intended for your card. My cooler came with the new single tube glue which was easy to use. They claim a setting time of one hour, I left mine for 2 ½ hours before I moved on to fitting the fan assembly. At the time my room temp was 30c so I guess it would have set OK in an hour, I just wanted to be sure they were on to stay! Apart from the heatsinks for the ram chips, I fitted the 5mmX 25mm heatsinks to the very small bank of chips (to the right of the ram chips) which run from top to bottom of the card, four heatsinks required. Then another ram heatsink (15x13mm) to the embedded multi sided chip on the right center of the board, looks like a controlling north bridge? I then fitted the four little white spacers onto the GPU mounting holes, the four black ones goes on the rear of the card (along with a black sticky pad), note it maybe different for your card make sure you use the correct spacers. When you fit the main cooler please ensure the copper block IS in contact with the GPU chip or your going to burn your card out real fast! Also ensure the cooler is not touching anything else or it may short out. Don’t panic there is lots of room to fit this cooler, just take your time & do it right check everything twice! There are two power options for the fans, a 7v connector or a 12v connector, it's so quiet on the 12 volts theres little point in using the 7v. Mine works very well indeed, with the stock cooler on manual fan control set at 50% it was noisy, at 100% it was like a jet taking off, but now you just don’t notice the three 90mm fans, which run at low rpm so are super quite, eq to about 15% on the stock cooler under manual control. It's dropped the temp down to 37c at idle (30c room temp!) plus about 43-50c under high work load. I'm well pleased with it, a great buy! The only thing I would say is that Arctic market this as a “7970” cooler, but it will in fact fit a large range of graphics cards which I feel if Arctic had made that fact clearer they would sell many more than they currently do. The packaging states it fits : HD 7970, 7950, 7870, 7850, 6970, 6950, 6870, 6850, 6790, 5870, 5850,5830. Also don’t expect much (If any) help as to what heatsinks fit what chips, regardless of what card you have, just remember you wont need them all. Use your common sense. Good luck. Review: How to transform a Sapphire 7970 (Vapor X GHZ edition) screaming jet fighter into a silent calm cooled beast! - After my initial bad experience with the seller, I was excited when this product eventually turned up on my doorstep. Although I do consider myself a technical person, I was still in two minds whether to carry out the installation because I've read a few bad reviews of the included glue, materials & instructions, and by people who ended up frying the GPU card. In the end, I watched a few tutorials on Youtube and decided to go for it, but I used a different glue which was permanent (Arctic Silver Alumnia) and this came with its own cleaner to prep the area. I also used a different thermal paste for the GPU (Be Quiet DC-1) because I didn't trust the pre-applied paste that came with the fan. I dismantled the stock fan from my GPU then I took all the parts out of the Accelero packaging and worked out how everything slot together. I took the old thermal pads off the GPU board and cleaned the ram chips with the Arctic Silver Articlean. I then mixed (one at a time) 5 small batches of the Arctic silver Alumnia glue and applied this direct to the new heatsinks. Within minutes, the glue started to cure so I had to be fast and precise when placing them. I must add, that I left two long stock heatsinks that was already on my particular GPU board because I thought they would be fine with the new fan. So with that part done, I then I cleaned off the pre-applied thermal paste from the Accelero fan and applied some DC-1 paste that I had lying around to the same surface. The last step was to screw the Accelero to my GPU board, it was a bit tricky but I managed it in the end. The whole process took about 30 - 40 mins. I then left the whole thing to cure for a further two hours, then I put the GPU in my pc (just to see it turn on), took it out immediately and left it overnight. In the morning I did a burn in test with furmark and it was SILENT throughout the process!!! (which was the main reason why I bought this) the maximum temp was great also (GPU now idles at 33C). I played Far Cry 3 and and the Splinter Cell Blacklist for a few hours and the 7970 was completely quiet, had to check to fans were even on... A happy man. Furmark results: Burn in score: 7277 points 72407 frames, 80FPS, 68C Resolution 1920x1080 (FS) -AA:0 samples FPS: min:45, max:96, avg :80
| ASIN | B0074VVK52 |
| Brand | ARCTIC |
| Compatible Devices | Desktop |
| Compatible devices | Desktop |
| Cooling Method | Air |
| Cooling method | Air |
| Customer Reviews | 3.7 out of 5 stars 70 Reviews |
| Global Trade Identification Number | 00872767005617 |
| Item Weight | 653 Grams |
| Manufacturer | Arctic Cooling |
| Manufacturer Part Number | Accelero Xtreme 7970 |
| Material | Copper |
| Model Number | Accelero Xtreme 7970 |
| Noise Level | 24 Decibels |
| Noise level | 24 Decibels |
| Number of Items | 1 |
| Power Connector Type | 4-Pin |
| Power connector type | 4-Pin |
| UPC | 872767005617 |
| Unit Count | 1.0 count |
| Wattage | 4.32 watts |
D**C
Super Size Super Cooler
I bought this cooler for use on a Sapphire HD6970 2Gb card. Removing the noisy stock cooler was very easy (see U-tube videos) it took about 10 minutes. Then as suggested by the instructions I cleaned the ram chips with a rubber erasure to remove any residue from the sticky pads. After which I used some Isopropyl Alcohol (IPA) on All the chips to be fitted with heatsinks. It's important to ensure the chips are clean before you stick the heatsinks on or they may fall off! Also do the GPU chip. You will find a vast array of heatsinks included with the kit, you wont need them all, just the ones intended for your card. My cooler came with the new single tube glue which was easy to use. They claim a setting time of one hour, I left mine for 2 ½ hours before I moved on to fitting the fan assembly. At the time my room temp was 30c so I guess it would have set OK in an hour, I just wanted to be sure they were on to stay! Apart from the heatsinks for the ram chips, I fitted the 5mmX 25mm heatsinks to the very small bank of chips (to the right of the ram chips) which run from top to bottom of the card, four heatsinks required. Then another ram heatsink (15x13mm) to the embedded multi sided chip on the right center of the board, looks like a controlling north bridge? I then fitted the four little white spacers onto the GPU mounting holes, the four black ones goes on the rear of the card (along with a black sticky pad), note it maybe different for your card make sure you use the correct spacers. When you fit the main cooler please ensure the copper block IS in contact with the GPU chip or your going to burn your card out real fast! Also ensure the cooler is not touching anything else or it may short out. Don’t panic there is lots of room to fit this cooler, just take your time & do it right check everything twice! There are two power options for the fans, a 7v connector or a 12v connector, it's so quiet on the 12 volts theres little point in using the 7v. Mine works very well indeed, with the stock cooler on manual fan control set at 50% it was noisy, at 100% it was like a jet taking off, but now you just don’t notice the three 90mm fans, which run at low rpm so are super quite, eq to about 15% on the stock cooler under manual control. It's dropped the temp down to 37c at idle (30c room temp!) plus about 43-50c under high work load. I'm well pleased with it, a great buy! The only thing I would say is that Arctic market this as a “7970” cooler, but it will in fact fit a large range of graphics cards which I feel if Arctic had made that fact clearer they would sell many more than they currently do. The packaging states it fits : HD 7970, 7950, 7870, 7850, 6970, 6950, 6870, 6850, 6790, 5870, 5850,5830. Also don’t expect much (If any) help as to what heatsinks fit what chips, regardless of what card you have, just remember you wont need them all. Use your common sense. Good luck.
H**D
How to transform a Sapphire 7970 (Vapor X GHZ edition) screaming jet fighter into a silent calm cooled beast!
After my initial bad experience with the seller, I was excited when this product eventually turned up on my doorstep. Although I do consider myself a technical person, I was still in two minds whether to carry out the installation because I've read a few bad reviews of the included glue, materials & instructions, and by people who ended up frying the GPU card. In the end, I watched a few tutorials on Youtube and decided to go for it, but I used a different glue which was permanent (Arctic Silver Alumnia) and this came with its own cleaner to prep the area. I also used a different thermal paste for the GPU (Be Quiet DC-1) because I didn't trust the pre-applied paste that came with the fan. I dismantled the stock fan from my GPU then I took all the parts out of the Accelero packaging and worked out how everything slot together. I took the old thermal pads off the GPU board and cleaned the ram chips with the Arctic Silver Articlean. I then mixed (one at a time) 5 small batches of the Arctic silver Alumnia glue and applied this direct to the new heatsinks. Within minutes, the glue started to cure so I had to be fast and precise when placing them. I must add, that I left two long stock heatsinks that was already on my particular GPU board because I thought they would be fine with the new fan. So with that part done, I then I cleaned off the pre-applied thermal paste from the Accelero fan and applied some DC-1 paste that I had lying around to the same surface. The last step was to screw the Accelero to my GPU board, it was a bit tricky but I managed it in the end. The whole process took about 30 - 40 mins. I then left the whole thing to cure for a further two hours, then I put the GPU in my pc (just to see it turn on), took it out immediately and left it overnight. In the morning I did a burn in test with furmark and it was SILENT throughout the process!!! (which was the main reason why I bought this) the maximum temp was great also (GPU now idles at 33C). I played Far Cry 3 and and the Splinter Cell Blacklist for a few hours and the 7970 was completely quiet, had to check to fans were even on... A happy man. Furmark results: Burn in score: 7277 points 72407 frames, 80FPS, 68C Resolution 1920x1080 (FS) -AA:0 samples FPS: min:45, max:96, avg :80
M**G
Unbelievable cooling performance, but MASSIVE!
I received this card today, and fitted it straight away. I took my time with it, watching youtube videos and reading articles explaining how to fit it, as a result, fitting took me about 1hr and a half (excluding the time waiting for the thermal adhesive to set.) Fitting was fairly simple; remove the stock heatsink, clean the components, apply the thermal adhesive and fit the tiny heatsinks. Wait 60minutes for it to set, and then screw on the main heatsink and fans. DONE! What turned the 1.5hr job into a whole evening job was modifying my case to fit the card.... the heatsink is 288mm long, however it does not fit exactly like the stock sink - about 3cm are wasted on the connection end, which means that when the cooler is fitted to the card (a 7950 in my case) it measures a whopping 315mm!! This was a problem for me, as my case supported GPUs of up to 290mm. As a result, i spend the evening removing rivets to remove the hard drive bay that was not designed to be removed. Eventually though, i finished the job, and my temperatures are amazing, not to mention the silence in which it does this! From mining at 75 - 80degrees C, with the side panel off, multiple auxiliary fans pointing at the card, and the stock cooler running at 75% which sounded like a hairdryer, my temperature is now 50 - 51 degrees C, with the side panel on, and the card not making much noise at all. The heatsink is huge, which helps spread the heat to a large surface area, but it's the fans of the cooler that impress me the most - they are SO quiet, that i am able to run them at high speeds (80% speed is quieter than my other case fans) which results in the epic cooling performance. Fitting this cooler requires disassembling your GPU to its PCB form, which truly isn't that daunting, but for a novice the potential to mess things up might put them off. I'd urge you not to be put off, but simply do your research first, in fact, even the included instructions will suffice, but for peace of mind, what some videos on youtube. Note: the pros are few, and the cons are numerous, but the pros are BIG, and the cons are somewhat negligible. For me, the pros FAR outweigh the cons that i'm placing an order for a second one (for my second card in my crossfire PC) tonight! Pros: - VERY good cooling - the core GPU temp has dropped 25 - 30 degrees C, and VRM temps don't exceed 70degrees. - well - stocked kit; you get plenty of different sized heatsinks to ensure that you will be able to fit the cooler to a wide range of GPUs/ - VERY quiet fans, that can be set to run at a constant 80+% speed without producing much noise at all. - CHEAP! at £35, you'd be a fool not to! (unless your case can't fit it) Cons: - heavy; it looks like it strains the PCB a bit, as it is only supported by the PCI slot and the two screws at the end which attach to the case. be careful when transporting your PC. - LONG; overall length is 315mm on a 7950, but even more space is required in order to get the GPU into the case diagonally first. I would only recommend this cooler to people with cases that have removable hard drive bays. - fiddly fitting, may scare novices away - THICK; it takes up 3 PCI slots, but would ideally take up 4 (to allow extra air flow to the fans) - that said, I will be buying a second cooler for my crossfire setup - i'll report back how the top card's temps are, once fitted, (currently at 88degrees C) - not the best looking cooler around - some cards have really attractive aftermarket coolers, this one has a tacky looking label on the side, but other than that, it just looks component-y with heatsinks and PCB visible, which isn't too bad.
C**C
Great cooling.
Great bit of kit, does need care and patients to get the best out of it. Now l have it fitted the cooler here are some figures: Well after using the little tube of thermal glue on the L shaped heat sinks on the right hand side line of VRM's as well as the top left VRM l get the following: Vrm 1 @ 80 max Vrm 2 @ 68 max Core @ 67 max All after 1 hr of playing World of Tanks. All other fans in case at silent. A lot happier with the temps using the glue and fitting the L shaped HS onto the RHS vrms. The graphics card is running at the following clock: GPU @ 1050. Mem @ 1500. VDDC @ 1.2ish V. This is the AMD bios (1GHz) upgrade stock settings. Using TRIXX to adjust the fan profile to ramp up the fans from 20% as soon as the GPU hits >30 'c all the way to 100% if the GPU hits 80'c. If you get the two part mix glue it take a good 24 Hrs to set, however the cooler turned up with the newer glue which takes 60(ish) mins before you can fit and use the card. There are plenty of guides online on the best positioning of the heat sinks for the RAM and VRM's. You also don't need to use the thermal glue on the RAM chips, Akasa double sided thermal tape will do the job just as easily, however to get the best temps on the VRM's you need to use the glue.
R**B
Awesome!
Little bit sceptical on how my cards temps would be after installing this. My graphics card used to sound like a train (xfx R7950 OC) when I play BF3 or BF4. When idle it was running at 40-45 and when in game it was running 70-85 so as you can imagine it was quite a noise. I brought this and installed it, the instructions arent that great very basic but go to youtube and put in 'Accelero Xtreme 7970 install & tutorial' The only problem i ran into was the thermal adhesive dried very quickly, so don't put it all on a tray at once, use it sparingly. I actually had to buy some more (which wasn't cheap) This is an amazing product though, my temps now run at 29-30 at idle and when in games the fan noise doesnt change AT ALL and in game temps now run at 40-45 - Yeah pretty incredible, halving my stress temps in game. I would give this a 5 star for performance and build, however the instructions could do with a touch up :-) The youtube part I posted should help anyone to install the card on a card similar to mine or use as a reference.
J**E
perfect
amazzing temp drop results highly recommended to all 7970 users as it destroys the stock heat sink by a million miles
W**R
Fantastic
Bought 2 of these for my loud & hot 7970 crossfire reference cards which were bugging me for months. Now I game at a max temp of around 60deg in near silence (fan wise) The installation process has been simplified slightly & I was happy to find instructions enclosed, rather than having to print from the website. All in all it took me around 2 hrs and was not difficult at all. Super impressed with this product, ill never go back to noisy gpus.
P**Y
Artic cooler 7970
Cartes devenues ENFIN silencieuses sous crossfire et Asus Rampage 4 Extreme ,bien vérifier la place disponible car il faut 6 slots pour tous faire rentrer les ventilateurs ne marchaient pas, remplacement par Artic Cooler en SAV assez efficace
O**Y
Ottimo
Ottimo. Da 92 gradi di test con 38 fuori abbassato a 56. ottimo. e silenzioso . Adesso si sente rumore solo di ventola di processore
K**S
Gutes Produkt mit katastrophaler Montage
Da der Originalkühler meiner XFX 7970 Black Edition auch im Idle Betrieb sehr laut war, musste ein neuer her: Pro: - Extrem gute Kühlleistung - Im idle Betrieb fast unhörbar leise, unter Volllast auch nach 30 Minuten Zocken nur sehr leise hörbar (laut CCC lief der lüfter nie über 30% Geschwindigkeit) Meh: - Platzbedarf: Bei meinem Case durfte der Festplattenkäfig dem Kühler weichen. Contra: - Die Montageanleitung gibt es nur online und selbst da ist sie versteckt. In schlechtem englisch wird einem da relativ wirr und mit grossen sprüngen erklärt, was ma jetzt wo wie draufpicken soll. es empfiehlt sich den originalkühler in griffreichweite zu haben, um zu kontrolliern ob eh alles, was vorher gekühlt wurde, auch jetzt noch kühlung hat. - Die Kühlrippen für die Spannungswandler: Ich versteh es ja nicht... da muss auf eine reihe Spannungswandler kühlrippen aufgeklebt werden... Die Kühlrippen sind allerdings einen guten millimeter (oder 2 zu dick ausgefallen und streifen (!) im schlimmsten fall an anderen bauteilen). Um einen Kurzschluss zu verhindern, soll man klebefolie links und rechts neben den spannungswandlern anbringen. Diese hat dafür dann die schlechte angewohnheit, sich nicht an die höhenunterschiede anzupassen sondern lieber die frisch geklebte kühlrippe wieder abzuheben. Dieses Drama hätte vermieden werden können indem die Rippen einfach einen tick schmäler gemacht worden wären... - Der Wärmeleitkleber: 5h soll er zum aushärten benötigen, 24 trifft es eher. und selbst nach 24 stunden ist er noch lange nicht "hart". ich habe beschlossen das ding mal zusammenzubauen und mit mehr hitze den kleber fertig einzubrennen. - Die "Spacer" sind prinzipiell eine super idee, dass die "kleberingerl" allerdings nicht zur isolation da sind sondern nur das trägermaterial für klebstoff darstellen war auch nur durch pures herumprobieren zu erraten. Die Anleitung schweigt sich über die genaue funktion aus. Fazit: Super Leistung, mangelhafte Montage und Anleitung. Könnte "Einsteiger" durchaus überfordern.
M**.
Das Muss für jeden (Retail) Radeon besitzer!
Ich nutze den „Arctic Cooling Accelero Xtreme 7970“ jetzt seit April auf meiner „Sapphire Radeon HD 7970“ und möchte diesen Artikel nun einmal rezensieren. Beim Auspacken dieses Artikels bekommt man schon Vorfreude, denn obgleich guter Performance ist die Radeon 7970 viel zu laut (Retail Design). Doch sobald man sich dann alles zurecht gelegt hat verfliegt diese schnell. Kurze Beschreibung: 1. Retail Kühler demontieren 2-5 Minuten. 2. Säubern der Spannungwandler und Speicherchips mit einem Radiergummi 2 Minuten. 3. Anrühren des Zwei-Komponenten-Klebers (in einer zu kleinen Schale/Box) 4. Kurze Wartezeit, Montage der Klebebänder, welche sensible Komponenten vor dem Kleber und der Berührung mit den Kühlkörpern schützen soll.(der Kleber ist erst nach etwa 5 Minuten bereit verarbeitet zu werden.) 5. Auftragen des Klebers, montieren/andrücken der Kühlkörper. (Der Kleber sollte in etwa 15 Minuten verarbeitet werden und für einen Anfänger ist dies bisweilen etwas schwierig.) 6. Mindestens 5-7 Stunden Wartezeit damit der Kleber aushärten kann. 7. Leider sind meine Erfahrungen an dieser Stelle anders, ich würde empfehlen den Kleber „mindestens“ 17-24 Stunden aushärten zu lassen, sonst kann es bei der Montage oder im Betrieb passieren, dass Kühlkörper sich lösen und möglicherweise die Hardware beschädigen. 8. Montage des Hauptkühlkörpers und der Backplate. Einfache Sache, nur die Sehr fummeligen Abstandshalter verkleben und dann den Kühlkörper mit der Backplate verschrauben. 5-10 Minuten. 9. FERTIG! Leider hat dieser Prozess bei mir (ich habe es zum ersten Mal gemacht) etwa 3,5 Tage gedauert, denn ich musste mehrmals nachkleben. An dieser Stelle verstehe ich auch nicht warum Arctic Cooling es nicht wie bei den günstigeren Modellen macht (z.B. „Accelero L2 Plus“ siehe auch meine Rezension dazu) und einfach Klebepads vorinstalliert. (Das würde viel Arbeit und Zeit, für den Anwender, sparen.) Aber die Arbeit ist es allemal wert! Die Kühlleistung ist brachial und er ist nicht zu hören. Jeder der sich diese Arbeit einmal antun möchte, um seine Nerven (und Ohren) beim Spielen oder anderen Grafikintensiven Tätigkeiten zu schonen, der sollte sich dieses Produkt einmal anschauen. Es ist jeden Cent Wert, allerdings muss mal wohl erwähnen, dass Arctic Cooling leider KEINE Anleitung in schriftlicher Form mitliefert und dies könnte man trotz all den Umweltproblemen, welche wir heute haben, bei diesem Preis erwarten. Lediglich ein Link ist auf der Packung zu finden… Über die Größenverhältnisse muss an dieser Stelle nichts gesagt werden, denn ein jeder der dieses Produkt erwirbt sollte sich darüber im Klaren sein was er dort kauft. Nur so viel, man sollte vorher mal nachmessen! ---------------------------------------------------------------------------------------------------------------------- Pro: - Sehr überzeugende Kühlleistung, das heiß „sehr viel Potential zum Übertakten (bei entsprechender Grafikkarte)“ - Nahezu unhörbar Contra: - Keine Anleitung mitgeliefert - Bedingt durch den Kleber, eher ungeeignet für Anfänger und eine recht hohe Motagezeit - (Bei der 7970) Nicht genügen Platz zwischen dem Kühlkörper und den PCI-e Stromsteckern (Bei einer Demontage muss man den Kühlkörper leicht nach oben drücken ---------------------------------------------------------------------------------------------------------------------- Meine 7970 läuft derzeit mit 1125/1525 (CCC 12.10) stabil und weit unter 70°C unter Last (meist etwa 53 -59° C). Maximal hatte ich bisher (im Sommer) 69°C. Fazit: Die Nachteile bei der Montage werden durch den Betrieb ausgeglichen und sind nach den ersten Minuten Spielzeit vergessen, wenn man die Grafikkarte nicht mehr hören kann. Deswegen gibt es von mir „5 Sterne“. Ich würde den Kauf jedem empfehlen der dem „Basteln“ nicht ganz abgewandt ist. Doch auch diesem Menschen würde ich den Kauf empfehlen, da sich dafür bestimmt jemand im Bekanntenkreis finden lässt!
Y**U
des plus correct
4 étoiles, excellent produit en soit, fournisseur comprehensif et tres professionnel. Néanmoins rien n'est parfait, surtout quand vous commander en France.
Trustpilot
1 month ago
3 weeks ago