
Descargar la aplicación


Servicios al cliente
Sobre nosotros
Copyright © 2025 Desertcart Holdings Limited
Descargar la aplicación


✨ Upgrade your walls, upgrade your vibe! ✨
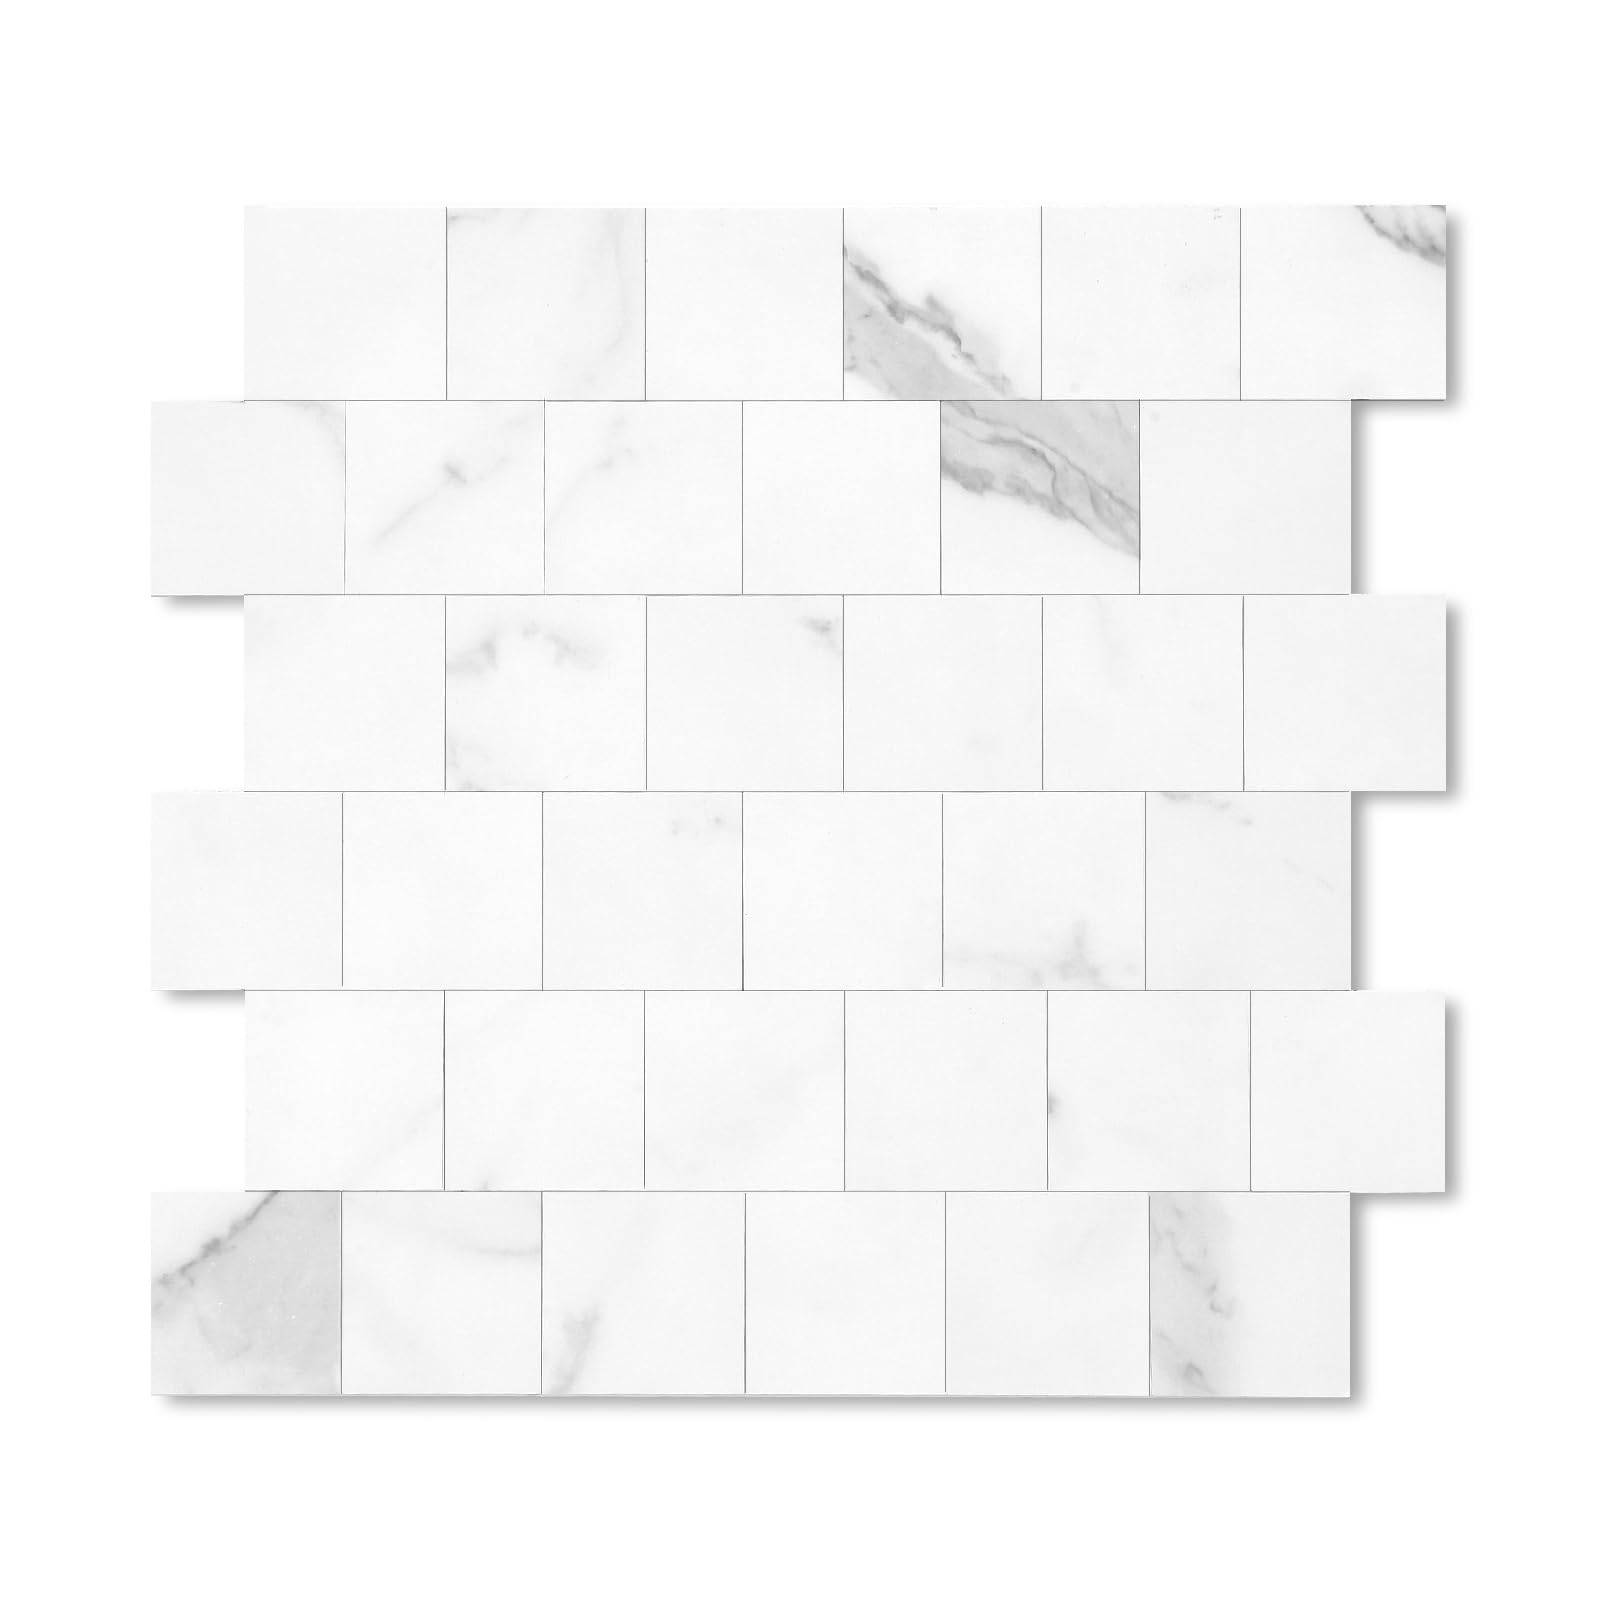
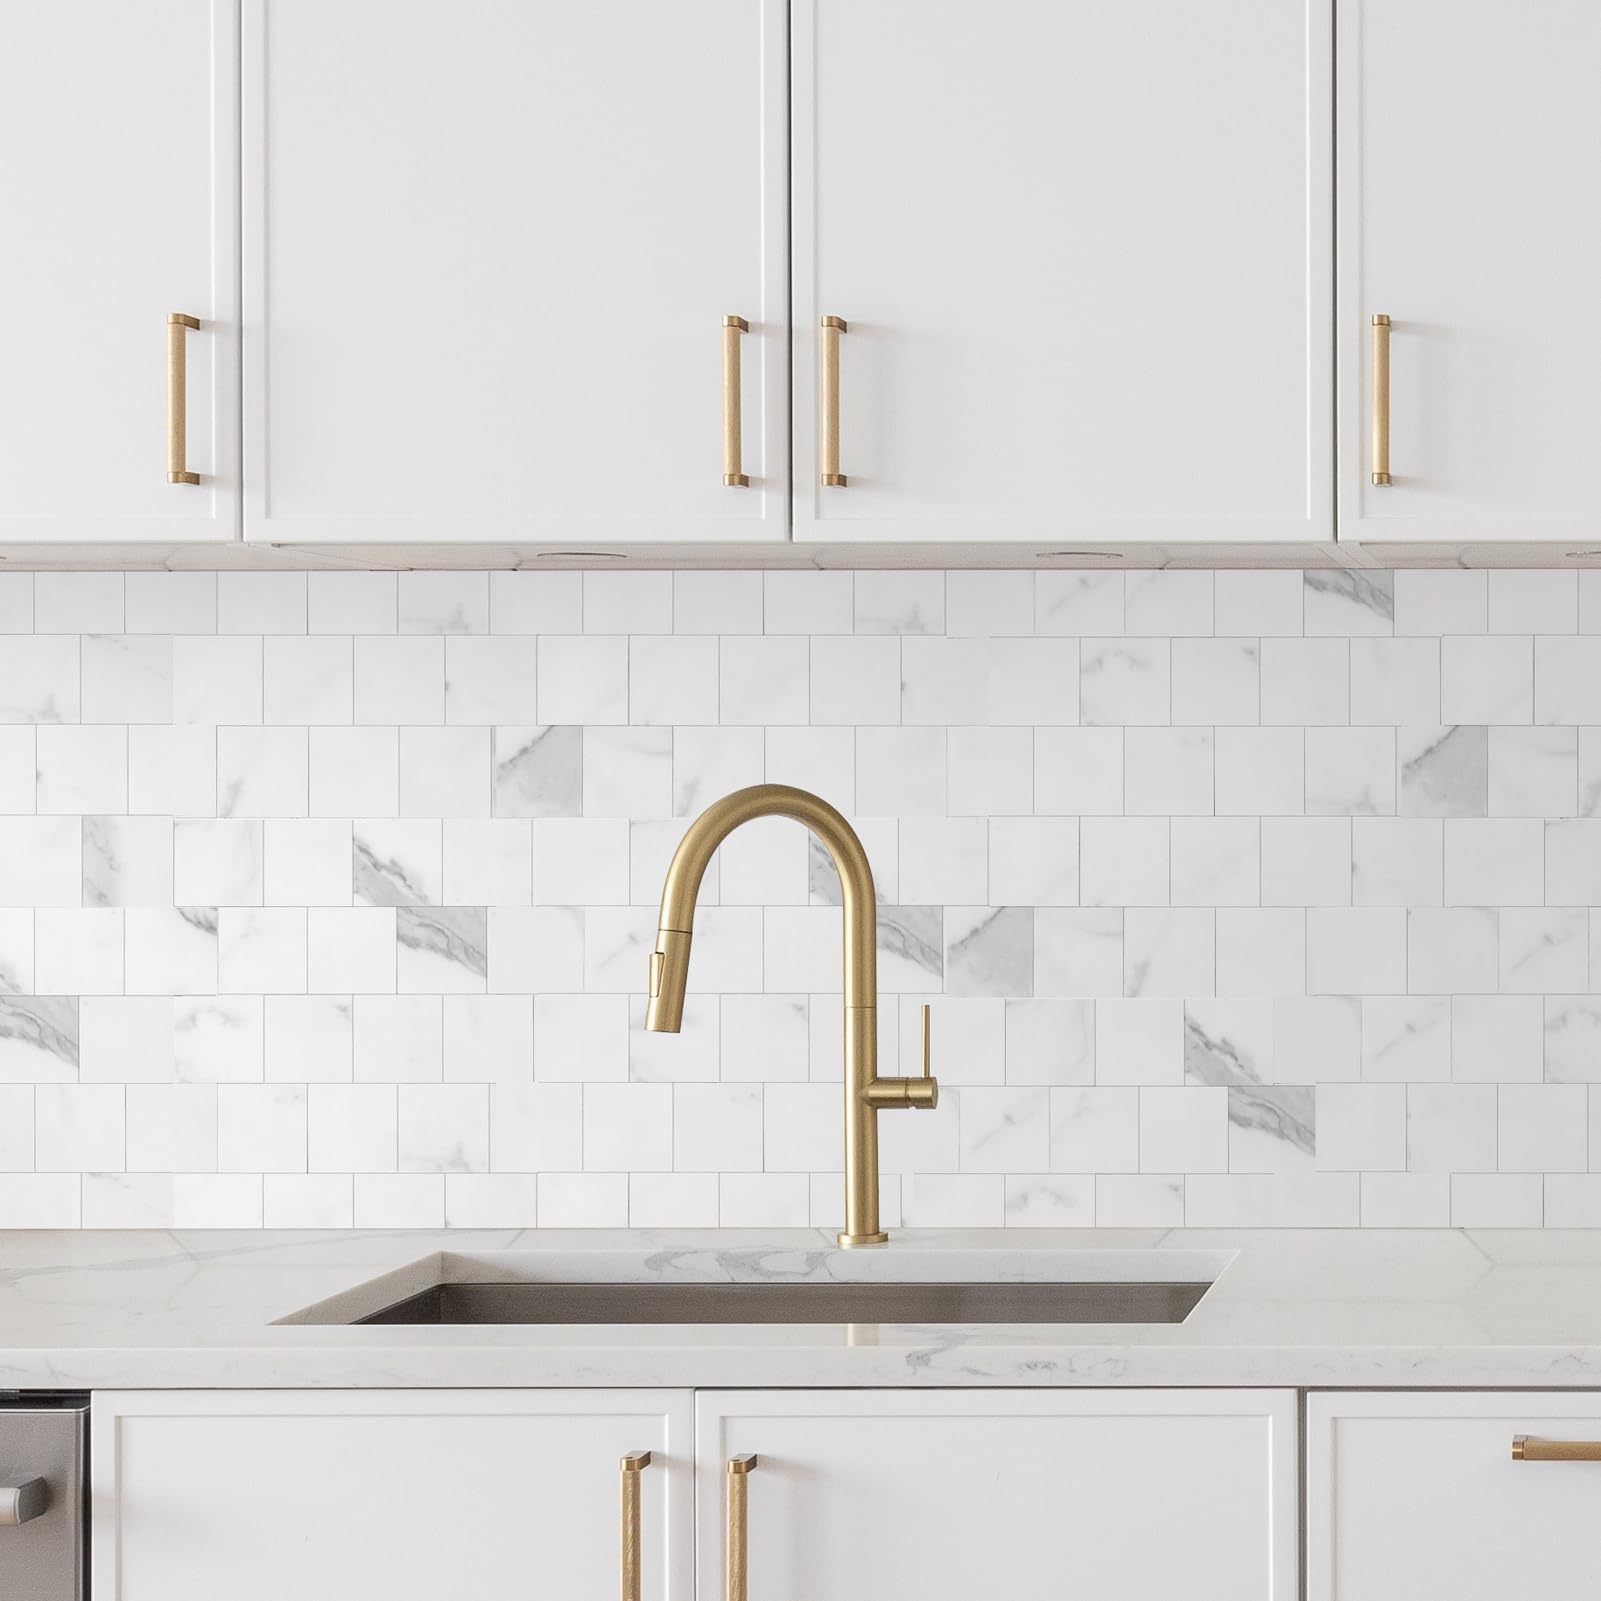
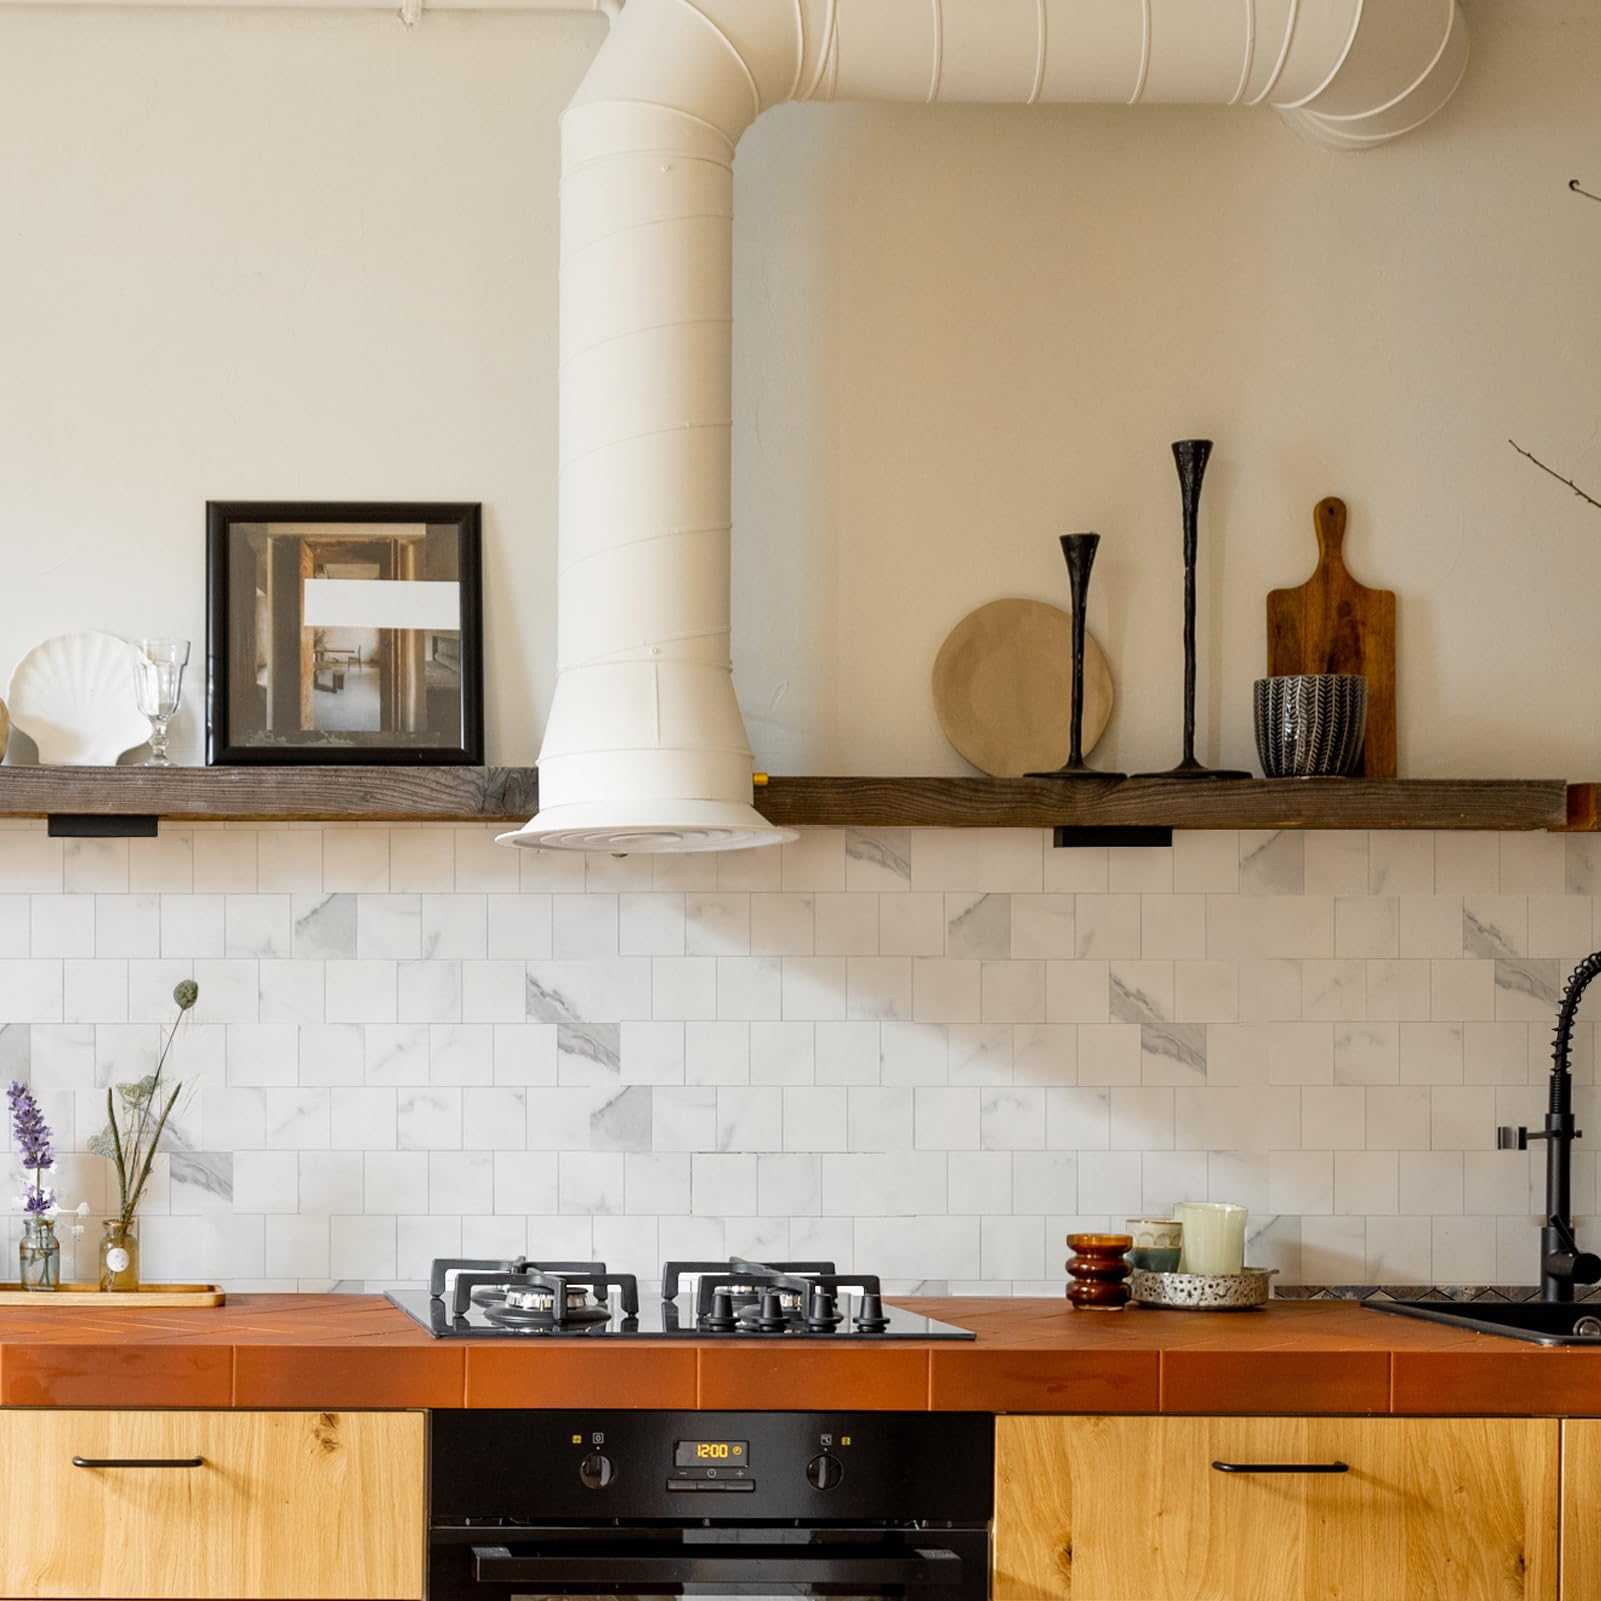
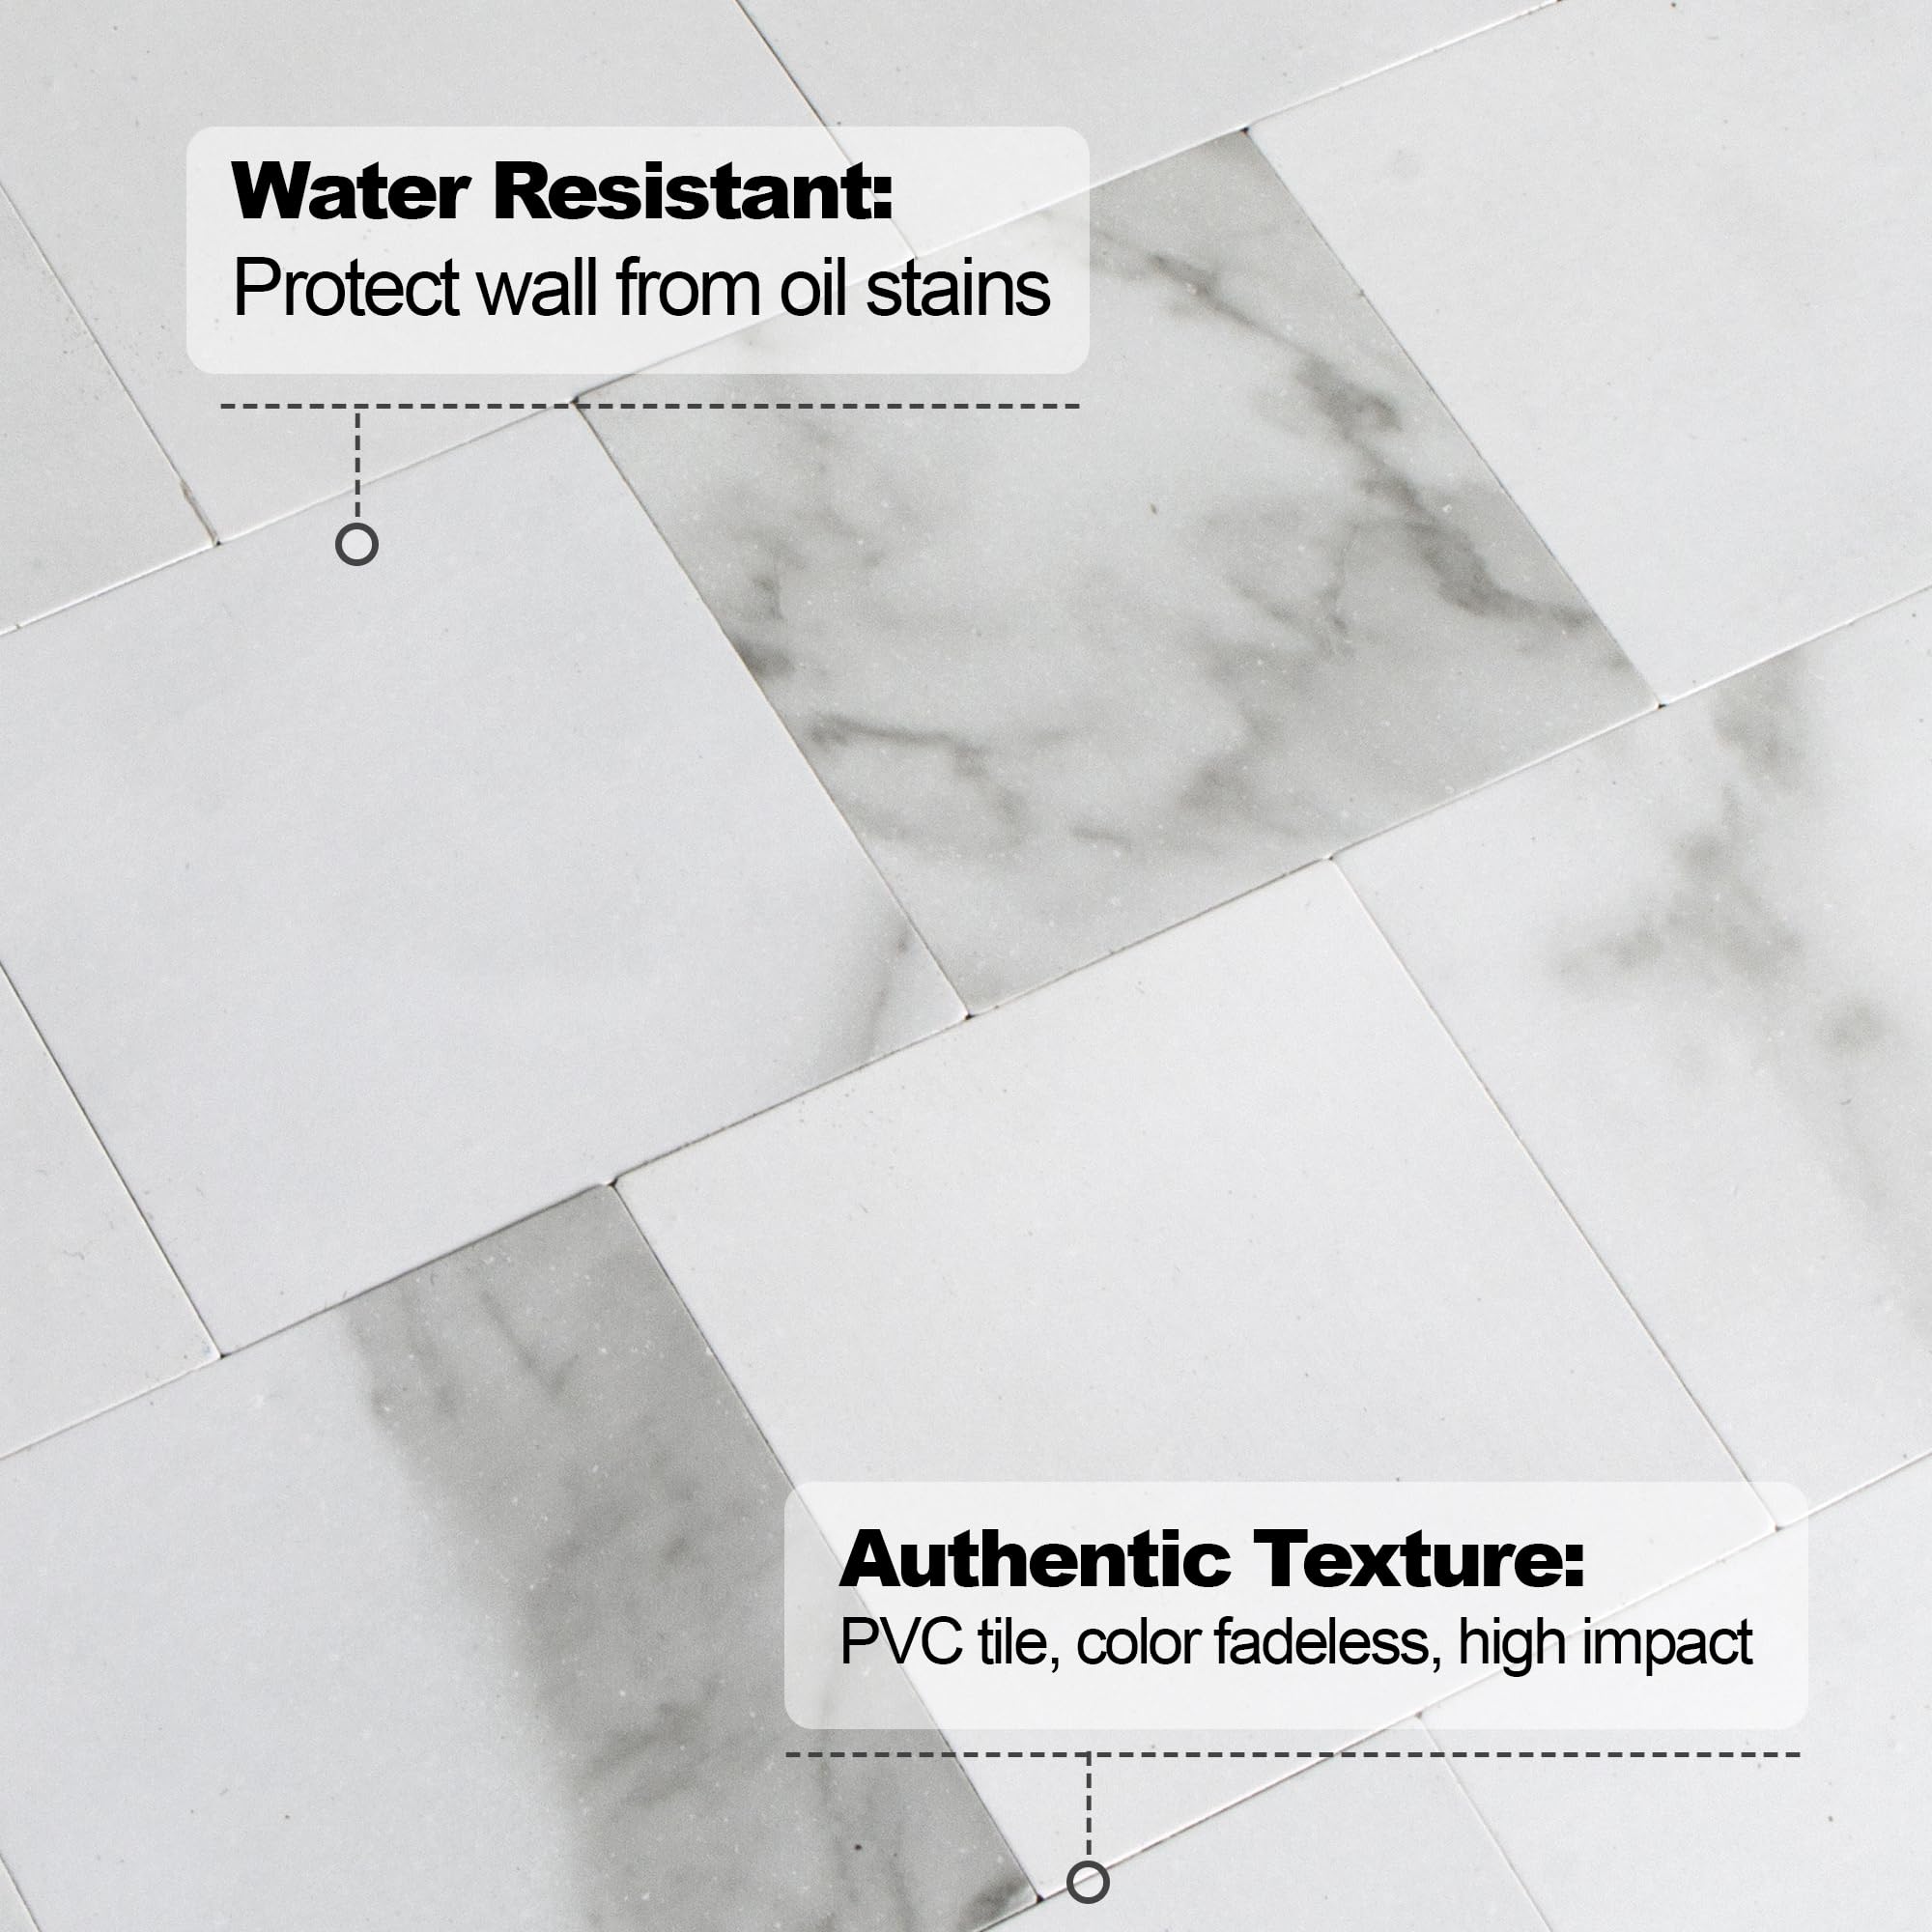
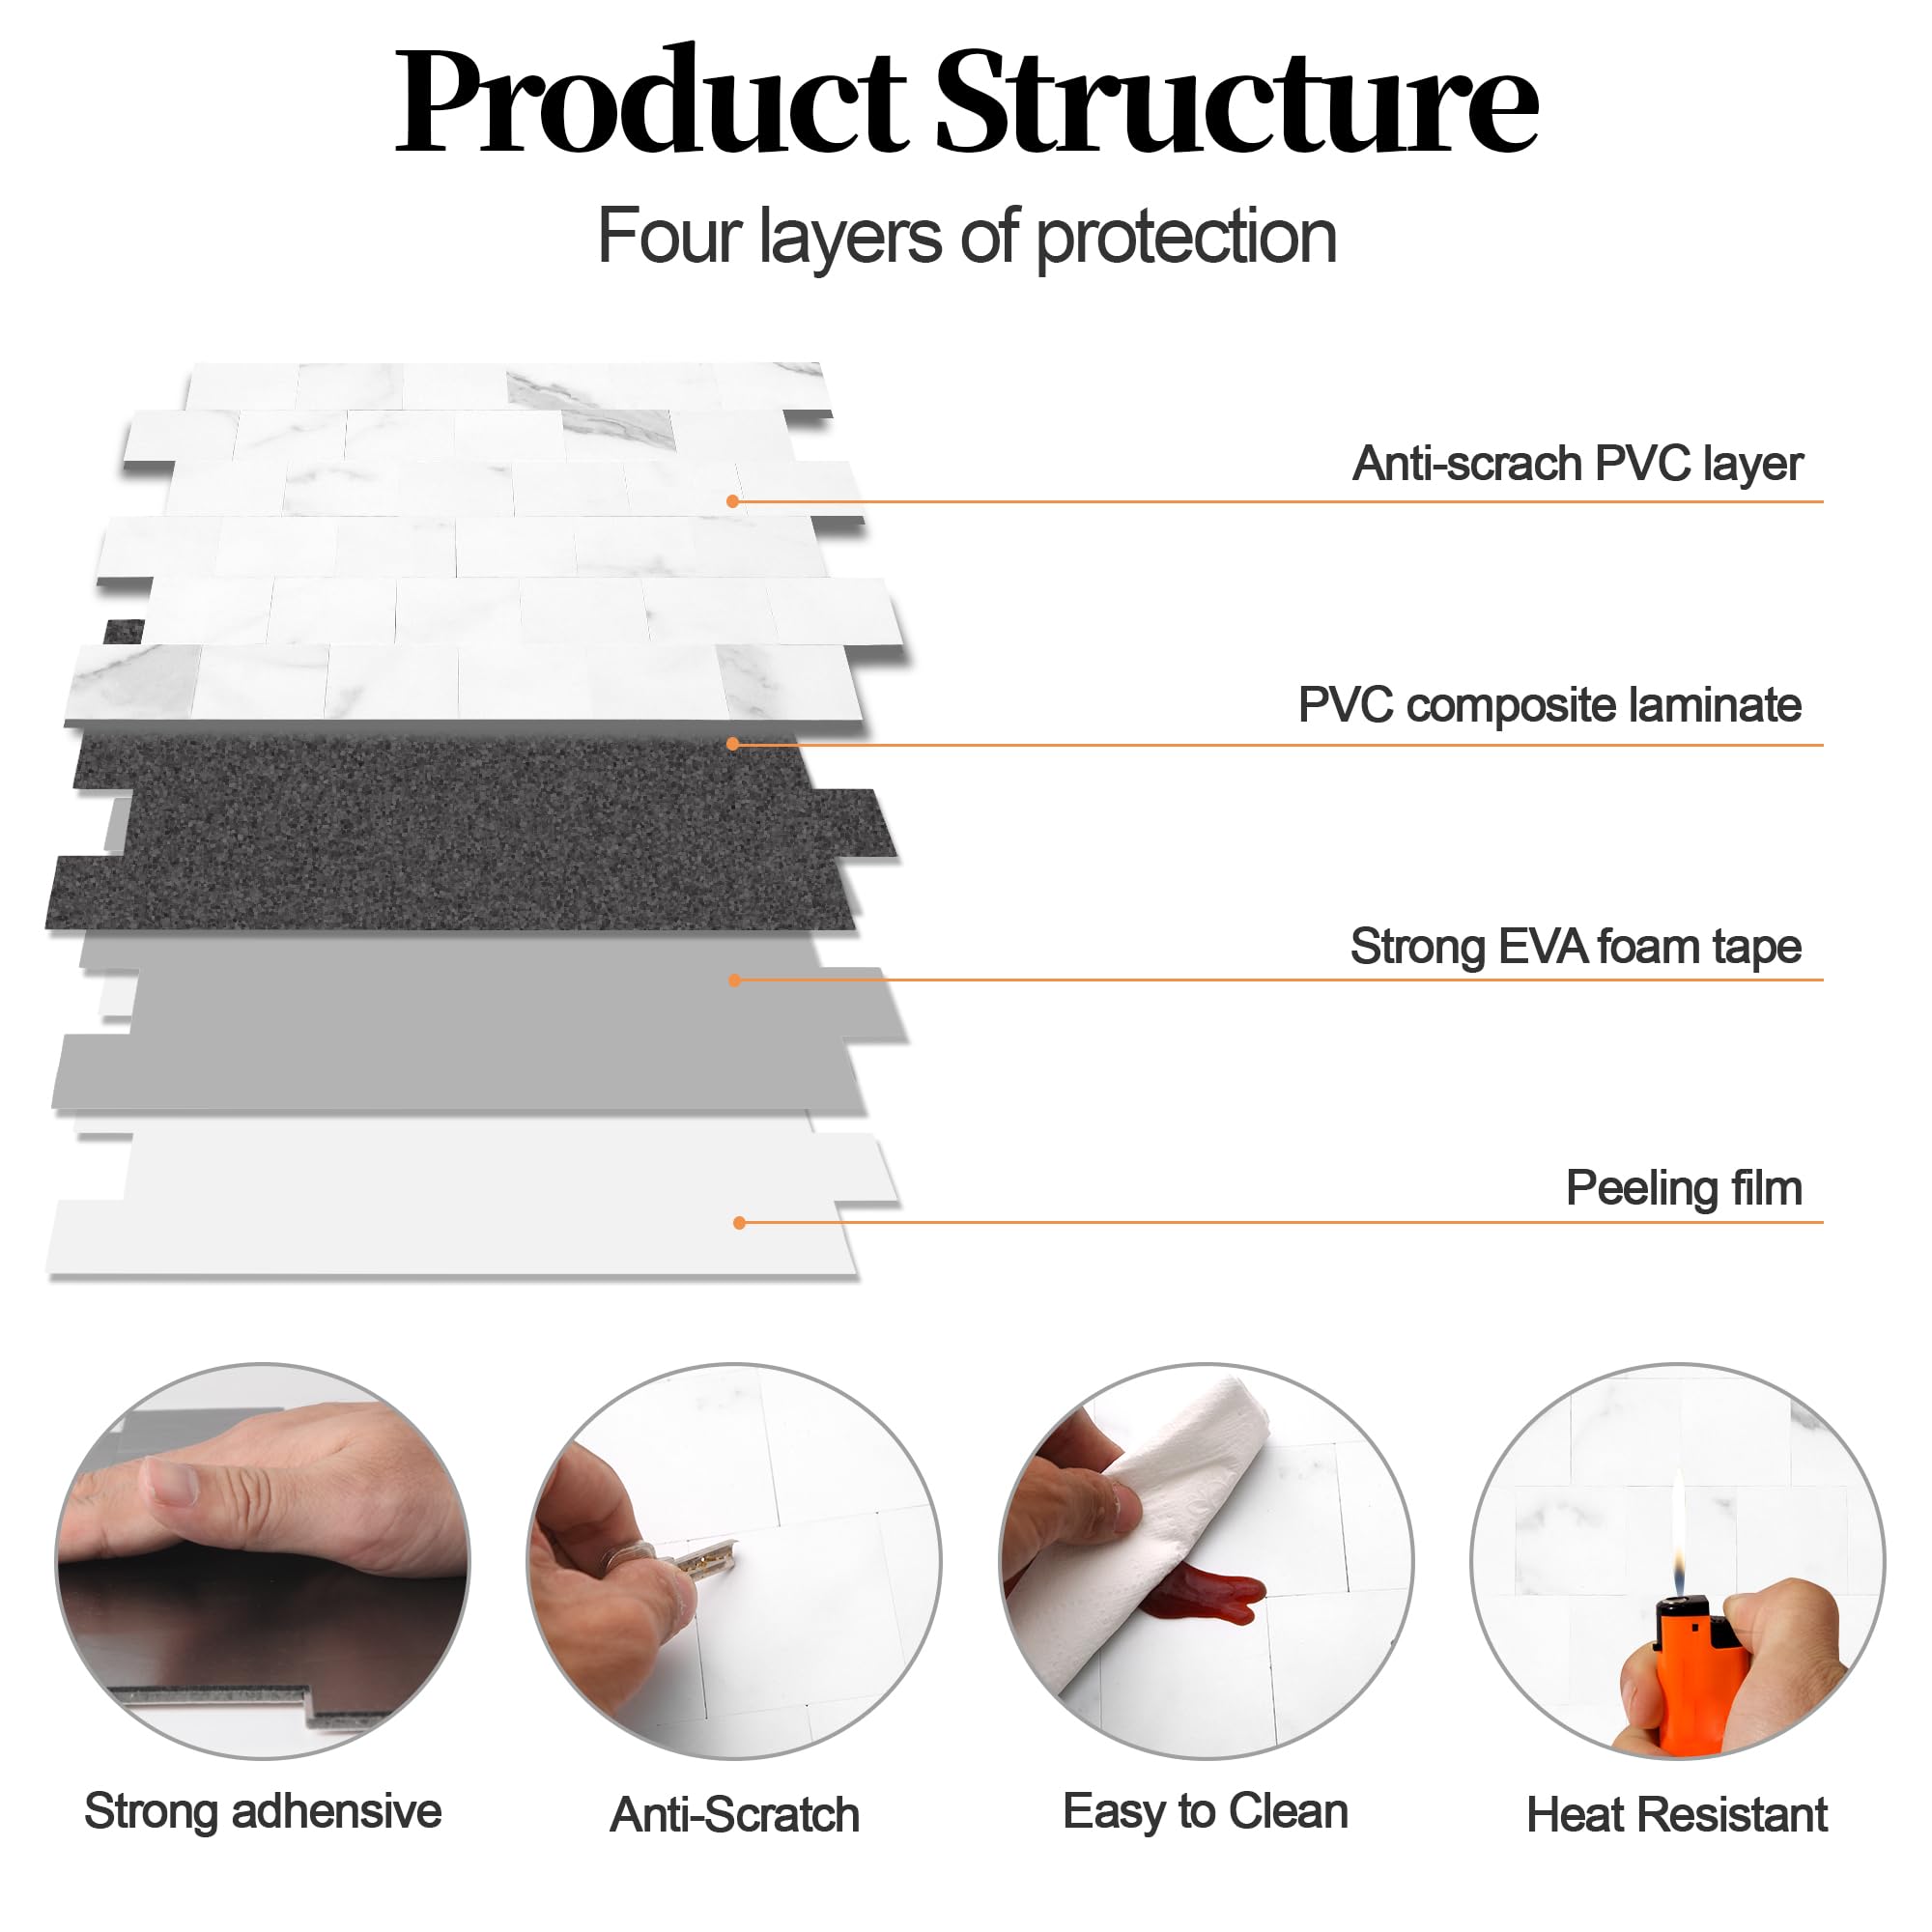
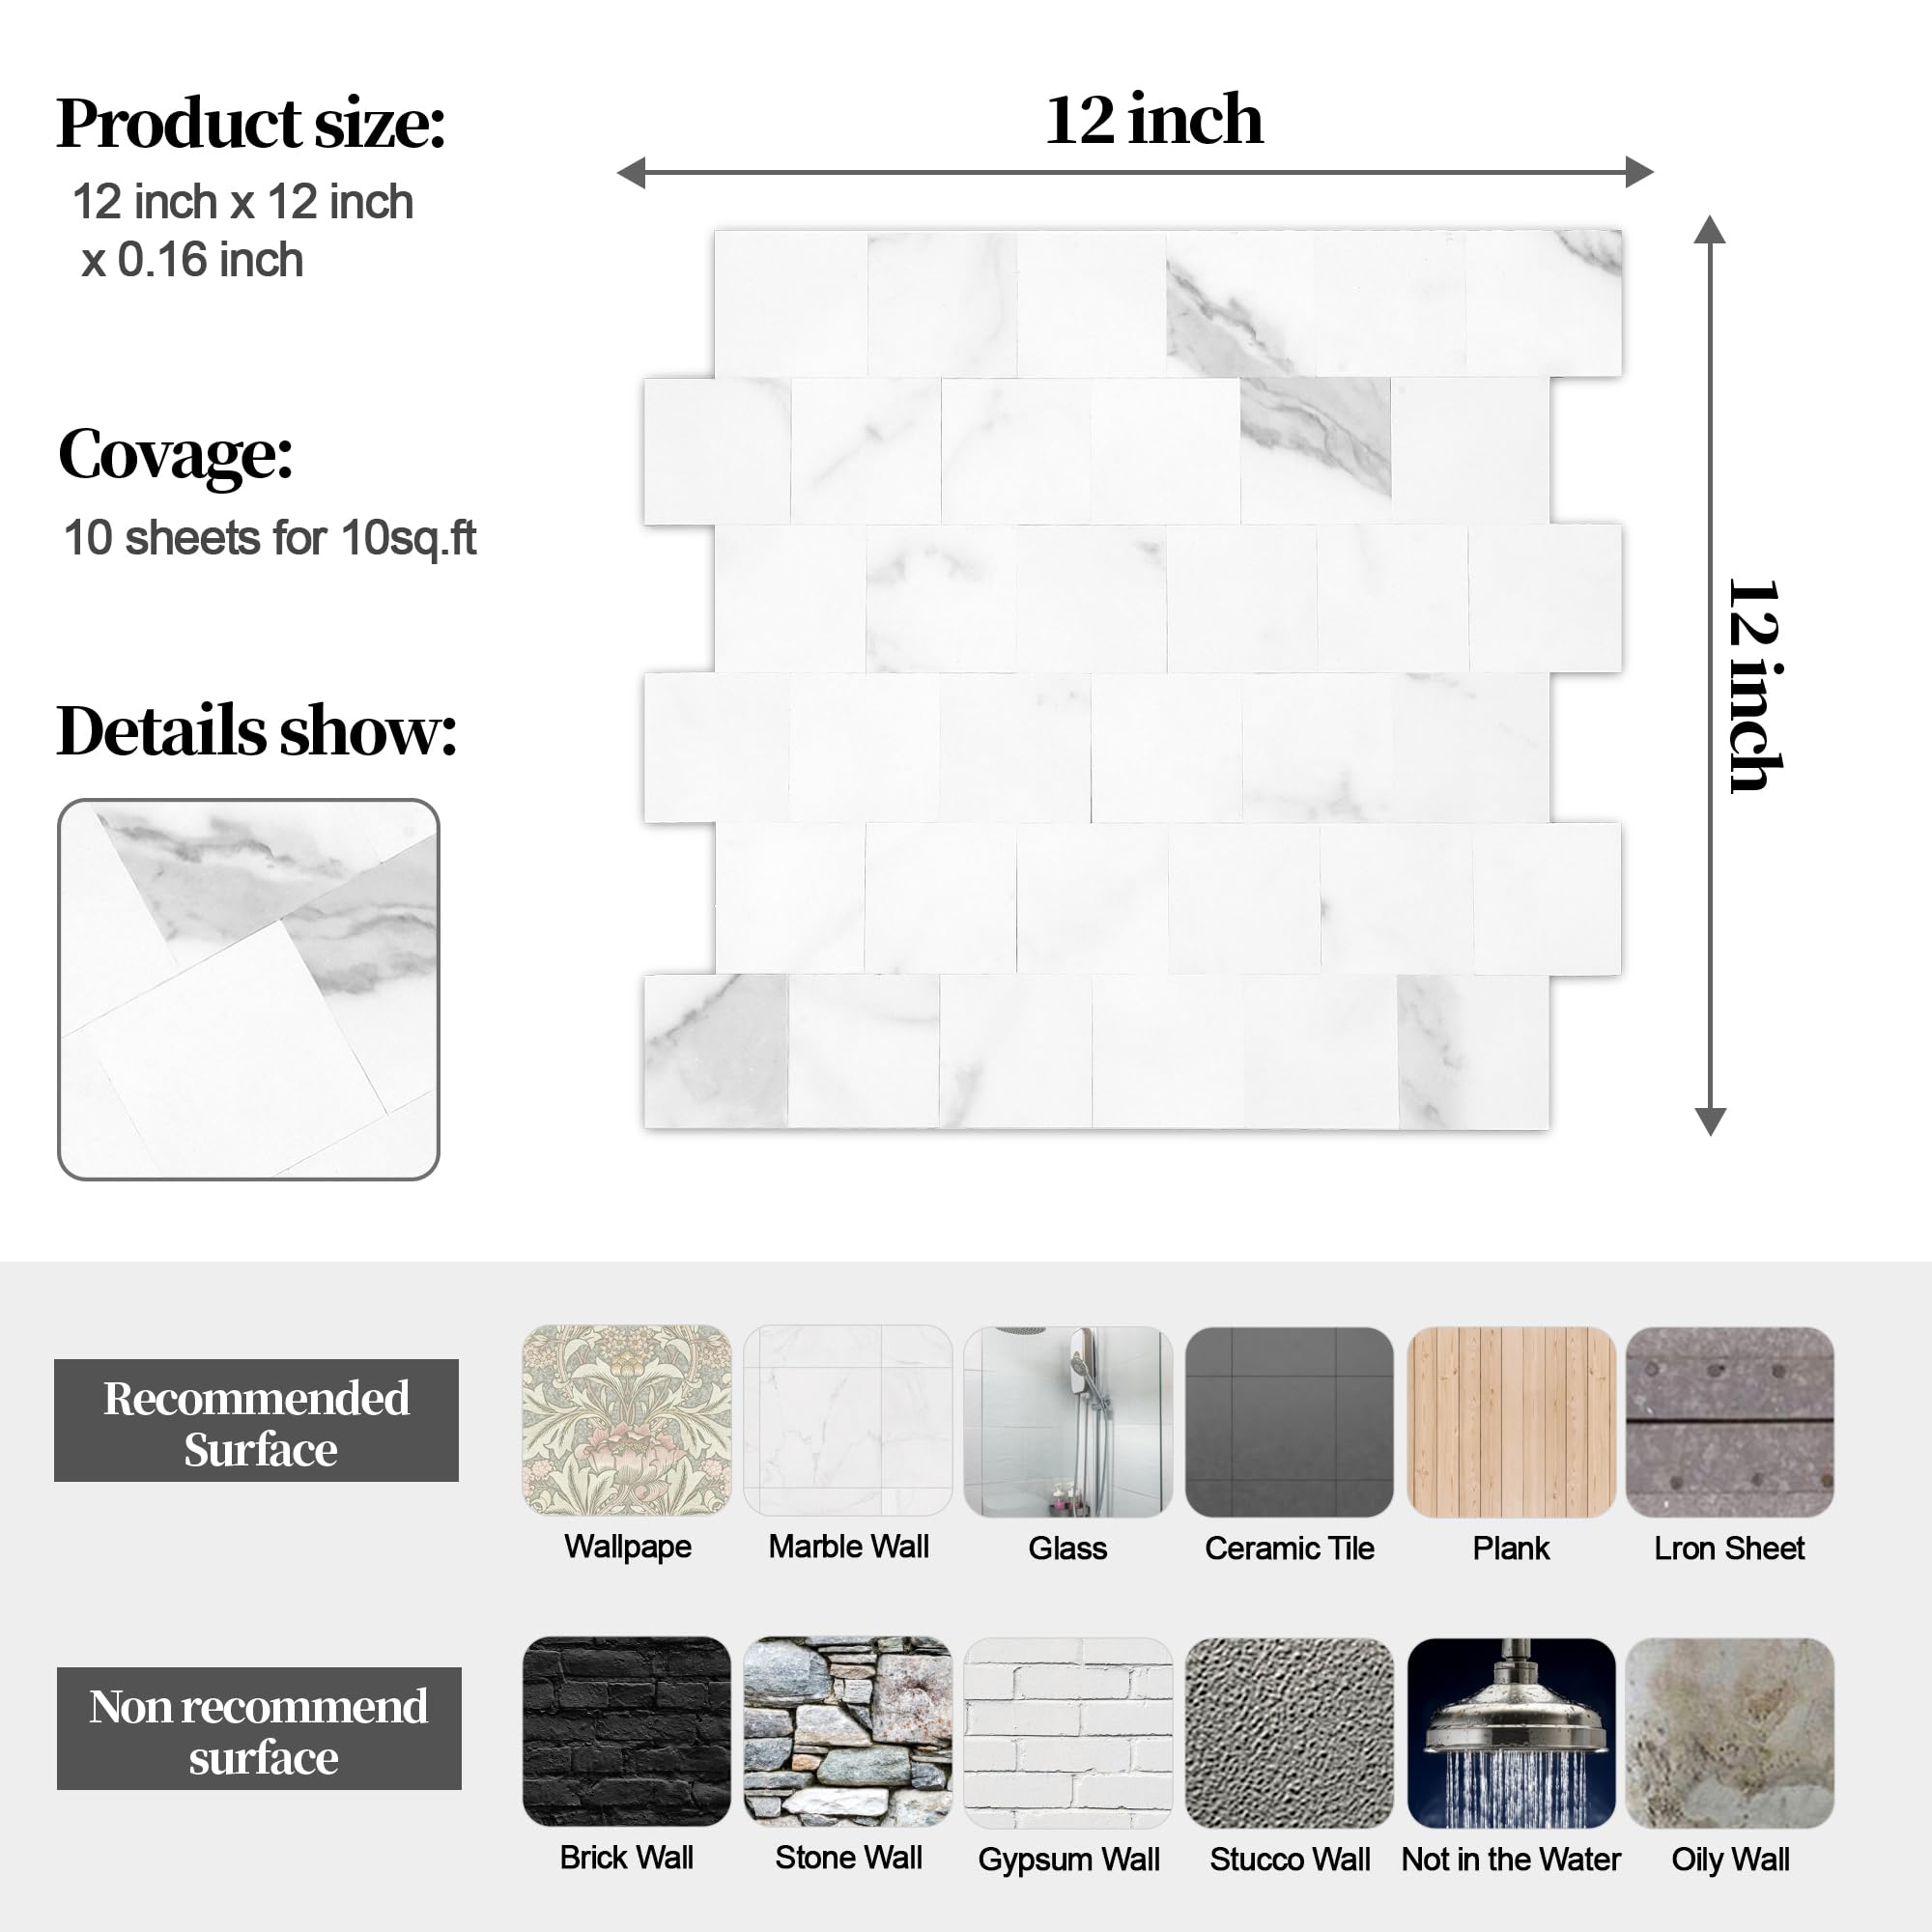
Yipscazo Peel and Stick Backsplash offers 10 sheets of 12''x12'' textured PVC tiles with a realistic marble look. Designed for easy, grout-free installation, these waterproof and heat-resistant tiles protect kitchen and bathroom walls while delivering a sophisticated, durable finish that resists scratches and stains. Perfect for stylish, budget-conscious home makeovers.


| Brand | Yipscazo |
| Material | Polyvinyl Chloride (PVC) |
| Color | Kara White |
| Finish Type | Textured |
| Style | Modern |
| Installation Type | Peel and Stick |
| Product Dimensions | 12"L x 12"W |
| Pattern | Marble or Nature Stone |
| Shape | Square |
| Item Thickness | 0.12 Inches |
| Edge Style | Square Edge |
| Unit Count | 10.0 Square Feet |
| Recommended Uses For Product | Bathroom, Kitchen |
| Form Factor | Square |
| Water Resistance Level | Waterproof |
| Manufacturer | Yipscazo |
| Item Weight | 5.85 pounds |
| Finish | Textured |
| Item Package Quantity | 10 |
| Coverage | 10 |
| Batteries Included? | No |
| Batteries Required? | No |
S**E
Backsplash was perfect for my needs
Shipping was fast and each tile was protected in the boxI found these Yipscazo peel and stick tiles to be very user-friendly when installing them above the stove in my kitchen. The cutting process was straightforward, and peeling off the backing to apply them to the wall was effortless. Easy to cut as each square can be removed and placed in smaller areas. I'm particularly pleased with how well the Marble Beige color harmonizes with my existing wallpaper, creating a cohesive look in the kitchen. This is such a practical and visually appealing product that was easy to work with and produced great results. I found the price to be reasonable. I have not had to wipe it down yet, but they appear to be durable.
M**S
Love the product and my "new" bathroom
My small bath ceiling has been a wreck for years; ceiling paint peeling, mold in upper corners, just ugly. I couldn't get a look to "come together." I started by fixing the ceiling with patching, anti-peel primer, anti-mold paint, then a sand-texture finish. I couldn't stop there, because the ceiling looked great and the drywall over the tub enclosure looked horrible.I research SO MANY products, including just putting the sand texture on the walls. I also priced new drywall and a new tub enclosure, $10K! Absolutely did not have that kind of money! Finally decided on the PVC 12" x 12" tiles, as I was not up to cutting the real-stone tiles that come in the same size sheet.I am crazy in love with the new look, and included some before, during and after photos.I watched a lot of You-Tube videos on applying peel-and-stick tiles first, then decided to start with the center of the large back wall and work out from there. Here are some tips for application, cutting, and keeping your project on track:-Do a test layout, and hold the tiles up with good quality painters tape until you are ready to start application. Decide in advance where your tiles will stop on the short walls; I stopped mine before the shower-rod holders so I didn't have to pull them out, reinstall, and patch the paint.-Set up a big cutting board over your sink/vanity. An adult-height vanity is the right height for all the cutting you will do.-Make a jig to hold the tiles, and tiny pieces of tile you will need at the end of the project for corners and tops. I used the boxes the tiles came in to make a corner jig. Free and quick.-This product is actually small mosaic tiles, not solid sheets. It's MUCH easier to apply if you break it down into single rows, or rows of 3. If you try to apply a full sheet on top of a full sheet, you will get gaps between the full sheets.-Peel off the backing from the bottom row, place the bottom row, then pull upward from behind the tiles. Again, press down on the rows to eliminate horizontal gaps, and you may need to press inward to eliminate vertical gaps.-You will need a lot of spare razor blades! I did not want to try an Exacto knife as I did not have spare blades.-I bought an Amazon- recommended product - the silver pvc edging strips. Really cleaned up the wonky final edges. See my "tools needed" photo - scissors were good for cutting thin slivers for perfect fits, and the hack saw was definitely needed for the silver edge strips. I also had a variety of straight edge tools for cutting, ranging from 6" to a full sized T-square.-You will feel like you are in a step class if you are doing this solo. Up and down the ladder and tub edges dozens of times for the corner and top and outer edge fittings.-Buy extra! You will get mad at a few cuts.-Put a towel in the bottom of the tub before you start, and some old socks on the legs of your ladder.-You will have red strips of the peel-off-backing everywhere; take breaks to clean up your debris.-These tiles are addictive.-The back wall took me about 2 hours to get right. The side walls took about 1 hour each, due to the inside corner cuts.- I am debating some customer-color caulk for the few edges that just don't line up, the interior corners, and the bottom where the tiles meet the fiberglass insert.-Have fun!
T**M
DIY on a dime!
I first ordered the ecru sample and was very pleased with the quality. The tile is textured and thick but I was able to cut pieces with scissors (heavy duty scissors work best). The color variations are creams, browns, tans and a touch of grey. Great for any neutral pallet though I would suggest browns and creams best. The back of the tile is lined with red peel off plastic that reveals a 3m type white sticky backing, no grout needed! It comes with offset 4 rows per sheet. The tiles "flex" on top of the sticky tape so very easy to trim into rows. I cut mine into two row strips as a shower border. They line up perfectly. I also cut to single rows down the side of the shower. The tile pieces themselves are on the thicker side so when cutting the off piece to fit in a corner it was a little tougher but not hard. This project went fast and it adheres strongly to my painted sheetrock. Be aware that when removing this from the wall, it will damage the paint and possibly sheet rock! When you place it, line it up lightly before you sick because once it's stuck, it's hard to peel off! Overall I'm very pleased and would purchase again. I did my project shown with 1 box and 1 sample piece and it was exactly enough!
M**Z
Great product. Great bang for buck.
This was a great product to work with. And it is a strong sticky material. I was expecting the tiles to arrive as a single sheet but it was a cluster of squares on a tile sheet. Pleasant surprise given the project I was working on. Also, I took the advice to order tin snips to cut this and that was an unnecessary purchase. My heavy duty scissors did just fine. It looks great. Feels good too. My only complaint is that it's "redder" than the gray I was expecting. Under bright kitchen lights I see gray. Under my warm living room lights, I see red. There's more between than gray which isn't what I wanted. I installed the product as tiles in my fireplace insert. That's why it's a 4/5 star. I may do a gray wash over it to cancel the red. We'll see.I'm not a fireplace person so I will not review how it performs with a fire going for it's heat resistant claims. Maybe in the future.Otherwise, really good product, great texture, non-flimsy, tough adhesion.
M**Y
Easy to use and looks great!
Having never done anything like this before, I was nervous about how easy it might be to use and if it would look good. I decided not to try this on my wall, just in case, but instead used a pre-fab frame that I repurposed. I found a copper tile and used that as my centerpiece and put the tiles around it. As you can see by the pictures, it's not perfect but I love the way that it came out! I used command strips to hang behind my stove so that I can take it with me if I move. The tiles are a nice quality, looks like real stone, and I found it easy to use. The adhesive is very strong and will stick as soon as it touches anything. I found it easier to peel off just a small section and be very careful about placing it where I wanted it, then slowly peeled the remaining backing off as I made sure that the tile was where I wanted it. Cutting it was easy, I used a pair of mechanics scissors and it cut easy enough, but I personally found it a slight challenge to keep the cut straight and even. Overall, I am very pleased with the results and will likely use the remaining tiles that I have for additional projects!
Y**U
高級感がでます!
洗面所とトイレの手洗い場に防水のため付けました。思ったより厚みも重さもあり、しっかりとしたもので貼ると一気に高級感が出ました!裏に粘着テープが付いているので、貼りやすいです。壁紙の上から貼りましたが、今のところ外れることなく付いています。オススメです!
C**A
Really impressed!
Brought these to make a slash back, wanted something cost effective, easy to do but not compromising on look. I always wanted a slate look but natural slate chips, hard to cut and really expensive.I’m really impressed so going to order more.TIP:Plain your placement - Once these are suck on they don’t come off easy.Easy to cut - I used a craft knife to deep score then snapped in half.Update September 2024. 4 years on reviewTiles are still in perfect condition.Always get asked if they are real slate and everyone touches them 😂Considering I used them as cooker splash back not one has stained, melted, cracked or came unstuck.Super durable.Yes, I did buy more and did the inside windowsill! They look great with the walnut blinds and worktops!Still very happy!
J**S
Product is too small and not worth the money
Not worth the money the small amount you getWill not cover a bathroom or kitchen unless it’s aKitchen side board .
Trustpilot
Hace 3 semanas
Hace 3 semanas