
Descargar la aplicación


Servicios al cliente
Sobre nosotros
Copyright © 2025 Desertcart Holdings Limited
Descargar la aplicación


🖤 Elevate your build, flaunt your style — the Thermaltake Core P3 TG is where performance meets art.
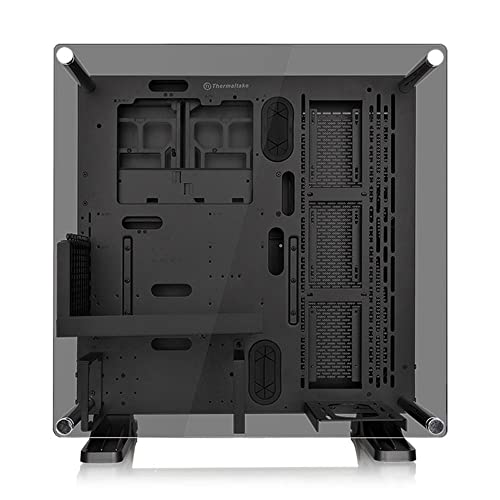
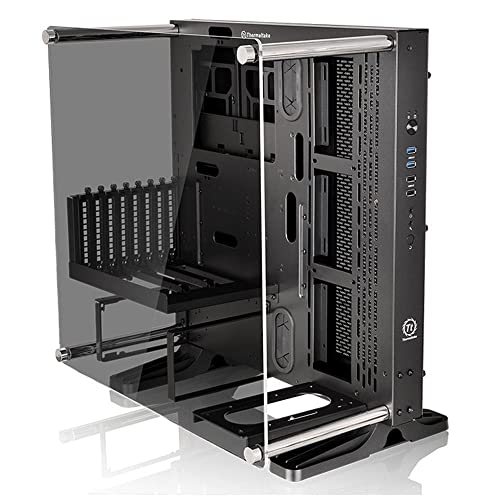
The Thermaltake Core P3 TG Black is a premium ATX open frame gaming case featuring a panoramic tempered glass panel and TT LCS certification for advanced liquid cooling support. Designed for enthusiasts who demand both aesthetics and performance, it offers versatile mounting options, robust build quality, and a spacious interior for custom configurations. Backed by a 3-year warranty, this case transforms your PC into a stunning showcase while ensuring optimal thermal management.


| ASIN | B07BFGB8Z6 |
| Are Batteries Included | No |
| Best Sellers Rank | #161,871 in Computers & Accessories ( See Top 100 in Computers & Accessories ) #1,501 in Computer Cases |
| Brand | Thermaltake |
| Colour | Black |
| Country of Origin | China |
| Customer Reviews | 4.6 4.6 out of 5 stars (1,196) |
| Date First Available | 8 March 2018 |
| Generic Name | Cabinet |
| Imported By | Creative Peripherals and Distribution Limited, 3rd & 4th Floor, Plot No. 137AB, Kandivali Co Op Industrial Estate Limited, Charkop, Kandivali West, Mumbai – 400 067 |
| Importer | M/s. TECHNOLOGY & GADGETS, #10/11, Atmaram Building, Pavwala Lane, Grant Road, Mumbai - 400004 |
| Included Components | Main Unit |
| Item Dimensions LxWxH | 18.5 x 54.9 x 54.1 Centimeters |
| Item Height | 54.1 Centimeters |
| Item Weight | 12 kg 200 g |
| Item Width | 54.9 Centimeters |
| Item model number | CA-1G4-00M1WN-06 |
| Manufacturer | Thermaltake |
| Net Quantity | 1 Count |
| Number of USB 2.0 Ports | 1 |
| Packer | Thermaltake, No. 185, Section 2, Tiding Boulevard, Neihu District, 114 |
| Product Dimensions | 18.54 x 54.86 x 54.1 cm; 12.25 kg |
| Series | Core P3 TG Black |
C**U
This case is a very well thought out design, with some minor flaws. I primarily bought this case as I wanted a new AIO now, but want to go custom loop later when I build a new system. This case seemed perfect for my current needs. PROS: - Great build quality: The entire case and glass is very well packaged to protect everything, and I didn't have a single flaw in my case. No scratched paint, dented sides, blemishes, bad threads, or anything like this. - Great cooling: I was worried that not having airflow across my motherboard VRMs would become a problem, but my temps have dropped a bit from my last case with a Cooler Master T4 Heatsink with Noctua NF-F12 120MM Fan that was paired with 4 120MM Rosewill case fans. Those four Rosewill fans are not longer used, so the heat just rises out with my setup. Mind you I am currently only cooling a 7700k at 4.5 GHz and a GTX 1080, but are not overclocked. - Design. Standing up this case looks great, but you could easily take off the side panel and metal rod mounts and set the case on its back and use it as a test bench. You can also mount it on a wall or to a desk with a VESA mount, but considering how heavy a full build is, I would never try it. - Glass: The smoked tempered glass is perfect. Acrylic is too cheesy for such a nice a build. - PCI-E Riser Cable: It works flawlessly with my GIGABYTE GTX 1080 WindForce 3X OC. I was no difference in 3DMark scores with it installed directly to the PCI-E slot or using the riser cable, so it appears I got a newer cable or got very lucky, as they are known to be a huge problem online. CONS: The Thermaltake website and spec sheets list full 420MM radiator support. While my Arctic Freezer II 420 mounted fine, the radiator cannot be mounted perfect. There is a support piece in the upper right front of the case that slightly blocks the top right radiator screw just enough that it forces you to drop the entire radiator down slightly. Once I got to the bottom I could not thread in the bottom two screws for my radiator as the holes didn't line up. They are correct on the case, but because the radiator had to be shifted down slightly it won't line up. I also had one screw right behind a USB 3.0 front header that I couldn't mount because the cable was perfectly in the way. I have 9 out of 12 screws mounted though, so I have no fear of the radiator coming off or sliding around. - Cable management: This case has so much room in the pack I was able to fit 2x 3.5" HDDs in the mount and randomly stuff 3x 2.5" SSDs in to the back with room to spare. - Pointless dust filter: If you use this thing for water, the dust filter in the back of the case becomes 100% useless. It would only protect the cable management area where drives are mounted anyways in an air setup, and that is with the flow backwards from looks the best. - Instructions: My god are the instructions useless. The diagrams are horrible and don't explain anything. They are useful for checking you got all your necessary hardware as it has a parts list, but beyond that they were more harm than good. I STRONLY suggest you watch multiple YouTube videos for the install, as I watched over 5 and not a single one got everything right. Watching those, along with the following tips will greatly help. ASSEMBLY TIPS 1.) If your motherboard has a CPU power connector up on the top of the board like most you need to remove the bottom HDD mount bracket from inside the case to run the cable behind it for better cable management. There are 4 screws for this on the motherboard side of the case. You don't need to remove the motherboard for this, there are two each side and that panel removes. I ran the cable underneath this bracket and reinstalled it. You can also do this without removing the bracket BEFORE you install your motherboard. 2.) If mounting GPU vertically, make sure you don't mount the power supply sideways, there are two PSU brackets included in the kit. You can install the PSU with the fan facing towards the glass, but only with a Micro-ATX board and no vertical mounting. The case has hardware to do it both ways. 3.) Make sure to attach the small support post to the power supply bracket BEFORE you install a power supply if you are going to install your GPU vertically with the riser cable. The power supply will block you from making this install. Use the flat screw designed to go into the recess on the PSU bracket so it mounts flat to your PSU. 4.) Be very careful with the threads. The case is very thick, but case steel tends to be very soft. Some of the powder coat is in the threads, so if you feel any resistance at all, back your screw out and check them. I ended up just slowly backing the screws out and back in a few times when I had this issue, and it only happened 2-3 times across the entire build. 5.) Carefully go through the hardware. There were 4 rubber plugs and washers that I thought were supposed to be anti-vibration mounts for a custom water pump, but they are actually rubber bushings and washers for the tempered glass panel. The plugs go into the glass to protect it, and the washers go on the thumb mounts for the glass. Totally protects the glass from any damage or vibration. Also make sure you are using the right screws for the right threads -- the manual is actual nice for this on the inside front pages, it lists how many of each screws or parts there should be -- but more importantly it lists exactly what it should be used for. You don't want to strip out a thread on this nice case. This case is my favorite I have ever had, and it is probably close to my 20th or so. I don't see myself needing a new case for a long time, and if I ever did change to a new one for any reason, this case would make a very good test bench, or maybe even a good closet wall mounted media server!
D**X
Me fascina el gabinete, un estilo de primera. Pros: -Materiales y acabados de primera calidad. -Suficiente espacio para instalar las tarjetas de video y disipadores mas grandes sin problemas. -La posibilidad de montar la tarjeta de video de manera vertical. -El acabado de vidrio templado se ve excelente. -Se siente muy sólido. -Posibilidad de montarlo en la pared o de manera horizontal en una mesa. Cons: -El instructivo es terrible, debido a la estilo del gabinete es diferente el armado a la mayoría de los gabinetes cerrados y las instrucciones incluidas dejan mucho que desear, tengo 15 años armando máquinas y este me.dio trabajo, recomiendo ver algún vídeo de armado de este modelo, ayuda mucho. -Es un gabinete para tenerlo fijo, el peso es alto por lo tanto moverlo puede ser complicado. Lo recomiendo ampliamente!!
P**A
Case itself is solid quite heavy and looks nice. However, power button sticks a lot resulting in boot cycles. If you don't hear the button click back just need to jiggle it. Additionally the mobo screws that come with the case are to long and don't hold the mobo tight. Overtightening result in the screw snapping before the mobo tightens. Make sure you have good mobo screws
S**S
I purchased this case with the main goal of wall-mounting my PC and having it not look like a messy black box strapped to my wall. It worked out perfectly in this regards. Somewhere I read that it doesn't come with the wall-mount bracket, and that worried me but all they mean is you need the same VESA mounting bracket you would buy for mounting monitors and TVs to the wall, you don't need anything specific to this case. Just make sure you use one that can support the weight. It took at least twice as long to assemble this case and mount my components than with a regular case, but it is easier and less frustrating than the same process using a traditional case (because my fat fingers don't have to stick in places where they're likely to drop screws). The case is more rigid than I anticipated and roughly on par with my previous cases. I haven't mounted any traditional drives as this PC is entirely NVMe, but there are a few brackets that would work for this if you want. You can print brackets for mounting optical discs, if you want to, but overall this case looks fantastic with minimal components so I wouldn't consider permanently attaching any drives to this PC. You will probably want a modular power supply with this case so you don't end up with extra cables dangling and unused (they can be tucked away out-of-sight, so it wouldn't be terrible). I mounted my GPUs using the traditional layout instead of mounting them vertically using the included bracket. If I wanted to mount them vertically I would have had to purchase an additional PCIe extension cable as they only include enough to mount a single card. I prefer the traditional look but I'm also told I'm an old fogey. This might be a negative: There are very few options for mounting case fans as the case is designed primarily around a water cooling system, but they provide an index of brackets you can order from online 3D printers so it takes extra time to get the case and figure out what will work for you and then wait for the prints to show up but you end up with what you actually want.
D**W
Well this case is the best I have ever had, open frame case on table gives me a great time for OC (I don't need to pick the battery off in the dark under the table any more), despite the installation instructions are hard to read ( I use the wrong screws all the time) but it's great, takes me about 5 hours to assemble, definitely not recommend to any people who have not assembled their PC before, but overall it looks cool Oh, forgot to mention, whatever air cooling or water cooling you want to use in the case, pick the one with a silent fan
Trustpilot
Hace 1 mes
Hace 1 semana